(Edit: See the finished quilt here!)
Hello, good stitchers! May is my month to be the quilter for the NURTURE circle at do. Good Stitches and this is the tutorial for the block I am asking everyone to make. We are each making 3 blocks this month, because that's how many this tutorial makes at a time. (I made two sets).
These are the colors I would like you to use, minus the plum colored swatch (4th from left), I'd like to add chocolate brown in place of that. Please try to stick pretty closely to the tones in the swatches (but use what you have). You will each only be making blocks in one of the colors. I would like to keep the quilt boy friendly/gender neutral. Here we go!
You need to select 3 fabrics and cut a 13.5" square from each:
a white solid (creamy or neutral white is preferable to bleached)
a polka dot fabric (mine were white-on-solid but yours don't have to be)
a solid that matches the polka dot fabric (mottled or textured solids ok)
Stack up your squares evenly, order doesn't matter.
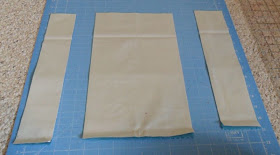
Make the first cuts from the right and left sides of the block. These are going to be wonky blocks, but we'll be keeping all our angles 90 degree. So, cut slices between about 1.5" to 3" from each side. They do not need to be the same on both sides, in fact, it's better if they're not!
Push the pieces you just cut out to the side but don't move them. Turn your cutting board 90 degrees and repeat the process.
Push the pieces you just cut out. Turn your cutting board back to the original direction and cut again. These are your last cuts in this direction, so the width of the section left in the middle will be the width of your center block.
One more time. Push the pieces out a bit, turn the board, and make your final cuts. You're done cutting.
Be careful to maintain all your pieces in their stacks in the right placement and orientation. On the outer four stacks move the piece of fabric on top to the bottom. From the innermost single block stack, move the piece of fabric on bottom to the top.
These are your three blocks, stacked up. The fabrics on top make one block, fabrics in the middle of the stacks make another, and fabrics on the bottom make the third. Each block should have one ring of each fabric.
Start sewing your blocks together one at a time, it's easiest to work with your cutting mat right beside you with the blocks spread out on it. Start from the center, sewing in the opposite order that you cut the strips. Because of seam allowances, you will need to press and trim after each round is added. Once your blocks are sewn together and pressed, line your ruler up with one of the seams in the block and trim to 10.5" square.
Hopefully you'll be able to get everything you need from this tutorial, but if you have any questions just leave a comment and I'll answer. Also, sometimes it helps to hear the same thing explained a different way, so you can read another tutorial for the technique used in these blocks here. (Note, she varied the angles of the cuts on her blocks where we are keeping everything square.)
(Edit: See the finished quilt here!)
Happy sewing, everyone!


In the top picture the green blocks have a little square. Are ours supposed to?
ReplyDeleteThanks
All the blocks should have a square inside a square inside a square (square being used loosely to mean a 4 sided shape with 90 degree corners, rectangles are fine). The relative size/shape of those squares in not important as long as they all fit. (The blue blocks, for instance, have a rectangle in the center. Does that help? Kat.
ReplyDeleteThis comment has been removed by the author.
ReplyDeleteAre we supposed to tell you what color we will be using or does it matter? Thanks!
ReplyDeleteYou don't have to tell me, but if you want to you could post in the comments here so everyone can see. I think we'll have a decent distribution if everyone just does what they have in their stash.
DeleteBelieve it or not I don't have polka dots in any of these colors. Will try to find some.
ReplyDeleteI finished my blocks today - fun and easy - I did light turquoise dot, plain turquoise and off white - posted pics on our group Flickr page. Now where do I mail them??
ReplyDeleteI guess I'm losing it because I can't find where I had the address either! please send to me...
ReplyDeletelisamcgriff (at) hotmail (dot) com