Showing posts with label baby clothes. Show all posts

Thursday, May 16, 2024

Baby Goodies

Happy Friday! I have some personal projects to show for the first time in a long while. These baby gifts are for a few friends having little boys. I love making these 60 degree triangle quilts for babies, so simple and dramatic.  I like to choose a backing fabric and then pull fabrics for the front based on the colors in the backing. (You can see a couple others here.)

This family is honoring a grandfather who was a pilot, so mama-to-be especially loved the backing fabric. I was happy to use some sock-monkey fabric on the front that I've has since about 2011. 

Next, I did some cyanotype dyeing. I usually do these by setting them out under the bright sun for about ten minutes, but because the sun moves there can be some slight blurring. This time I tried using a UV light rigged it up in a light box. The trade-off for more crisp, clear lines is that I can only do one at a time and it takes nearly 4 times as long exposure time as under the sun.

I have plans to do some more dyeing soon, if only the cats weren't quite so helpful it would be easier!

The face of a boy who brought in a lizard off the catio into my bed to wake me up

Covered in Love is a 501(c)(3) charity that donates quilts to patients dying in the hospital, over 1400 so far! The April-June block drive is live now.  Check out the main post HERE if you want to get involved.


Thursday, October 13, 2016

Babies, again

More baby sewing? Yes, more!  It's apparently baby season around here. Two of the four have made their debut, little girls. Now we're just waiting on those twins!


I wish I had taken more pictures of these, but I was in a rush to get them packed up.  I'll explain everything better below:

  • (2) of the Best Bibs in the World! made from the Bapron pattern.  Everyone I've given these to has loved them once baby starts on real food.
  • (2) pair of Big Butt Baby Pants, (size 0-3 and 3-6 months).  The larger pair used some of my wood block stamped fabric.
  • a "slouchy" baby beanie size 6-12mo. It looks big to me, maybe babies have bigger heads than I think...   Or maybe she'll wear it when she's three.  Either way, I really liked the pattern. I modified it to line the hat and hide all raw seams.
  • a flannel/minky receiving blanket made pillowcase style from remnants
  • finally, everything is sitting on the smaller scrappy flannel quilt I made last month
These have winged their way to my college friend and fellow quilter Libby who recently welcomed baby Vivian to her family :)
 

PS- Check out these lovely quilts for Covered in Love that one of my do. Good Stitches mates, Dhia, recently sent in!  These were our May and March group blocks I believe.  You can read Dhia's post about them  here.


Linking to Crazy Mom Quilts Finish it Friday.

Thursday, July 21, 2016

Baby baby Finishes!

This week's sewing was all about babies!  I have three friends/family having babies around October, and one of them is having twins! So I have no shortage of baby sewing to be done.


I don't know if you have Hancock's Fabrics where you are, but it has been one of my favorite places to shop and is unfortunately going out of business :(  I went by a couple weeks ago and there wasn't much left but I found some things to scoop up on a discount. I got several handfuls of iron-on baby appliques.


I bought plain onesies at WalMart and sewed the appliques onto them, rather than iron. For the twin boys there are two "peas in a pod" ones.


These girly ones are for my cousin.  My friend Libby is also having a baby (gender to be a surprise) but since she is a quilter I thought she might have more fun with the appliques herself.  Rather than apply them to anything I dropped a few in the mail earlier this week.


The twins will almost certainly come early, and more than likely spend a little time in the NICU so I made up four of these reversible preemie NICU smocks for them.  (Pattern free from Everything Your Mama Made & More.)  With any luck they will never need them and they'll be donated to the NICU unused, but just in case we're ready. 

(same 4 gowns on their reverse side)
These function on the same principle as a hospital gown: they can be quickly put on and taken off and allow for various tubes and whatnot to be passed through, but it gives the parents the comfort of seeing the baby in clothes.


Finally, I sewed up this cute sleeping bunny baby lovey I saw on Quilting Stories.  The backing of the patchwork is a plush minky for baby to snuggle with and the bunny's face is flannel.  Embroidering the facial features was the hardest part for me, but after some ripping and restitching I managed to make 2 eyes that look mostly alike.


Baby sewing is so much fun. I sew mostly for the other end of life these days, and I love that too! But there's just something about sewing for a new baby. I guess there is a certain symmetry to it.

Happy Friday! Don't forget the Covered in Love July block drive is going on now.

Linking to Crazy Mom Quilts Finish it Friday.

Tuesday, July 16, 2013

Tie-ing and Dye-ing

The t-shirt I did for myself. An off center spiral dyed in pie sections.
So I tried something new this week. Tie-dye! I was inspired by the tutorials over at Jedi Craft Girl's blog. She just did a week of tie-dye tutorials that totally explained the methods of folding and dying in a way that made it make sense. I can't believe I got results this nice on my first dying attempt.  Major props to Amanda for her good teaching :)

L to R: Off center spiral dyed in pie sections; Starfish symmetrical design with pleats at the bottom; Pleats; Spiral dyed in spiderweb; Pleats; Spiral dyed in spiderweb style, different colors on the front and back
Personally I've never been a huge fan of wearing tie-dye. I don't know why, I guess it's just not something people do in my part of the country.  I had to make at least one shirt for myself (first pic in the page) but for the rest of them I did what I usually do and made baby stuff!  I got 2 packages of Carters plain white onesies. They are 100% cotton and took the dye just great.


I took closeups of a few of my favorite designs. This one is made by folding a spiral and then applying the dye in a spiral to create an effect Amanda calls "spiderweb."  The tutorial for this one is here.  You really have to go read the tutorials, she makes it so simple!

Of course, the great thing about tie-dying for babies is it just makes sense. Babies are messy and nothing disguises spit up quite as well and a bright, loud, busy design.


This one was done using the running stitch technique from Amanda's "Symmetry" tutorial.  I wasn't sure how well it was going to work until it was done, but I couldn't be happier. After folding the starfish I folded the bottom of the onesie in pleats to get the effect on the purple stripe.

L to R: Multicolor spiral dyed in pie sections; Double spiral with random dye; Symmetrical starfish with bulls-eyes around it; Symmetrical V done with running stitch; Spiral dyed in pie sections.
My friend who I am always making baby stuff for also has an almost-two-year-old so I bought a package of 2T/3T plain white T-shirts to dye.  Both these and the onesies are found in the baby section.


This one is probably too purple for a little boy, but I really like the way the double spiral came out.  I also like how this one has a lot more white. Dyeing such small shirts it is hard not to add too much dye, so most of mine didn't end up with much white space left.


The one was a spiral dyed in pie sections.  The lime and aqua are definitely my favorite color combo.  One of the interesting things I noticed is that the thread remained white after dying, in both the onesies and the shirts.  I suppose that's because it's synthetic? Still weird considering there doesn't seem to be much these dyes won't stick to.  I dyed out concrete porch, the wooden porch rail, the inside of our dryer, and my hands! (Don't do what I did, protect yourself and your surfaces from dye! I'm just a slow learner.)


This shirt was dyed the same as the starfish onesie, using the running stitch symmetry technique.

I did all these with a Tulip 5-color "Luau" dye kit. The kit comes with one refill for each color, so I still have enough to do at least this many again. They also sell individual colors, so I think I may add yellow to my set.  Amanda recommended to use soda ash to help the colors stay bright, but I wasn't able to find any locally.  I went on without it and was completely happy with the colors I got, but I am looking forward to trying this again with soda ash to see the difference.


I know I've said it several times, but you really must click over to Amanda's blog and see all the great designs she and her family made. It will inspire you to get busy and get dying, too!

Since wrapping up her Tie-Dye extravaganza, Amanda's next project is A Week of Quilt Tutorials July 22-27th.  I am thrilled to have been invited to participate in this one :)  Look for a revamp of my Simple Strips and Scrappy Herringbone baby quilts on the 24th and check in all week to see all the tutorials.


Linking up to Finish it Friday at Crazy Mom Quilts :)

Wednesday, July 10, 2013

Applique Onesie Tutorial

Unique applique onesie!
Since I have been showing quite a few of these appliqued onesies on the blog lately I wanted to put together a tutorial on how I make them.  They are super easy to make and always well received by mom!

Step one is to get your onesies.  I sometimes buy packs of plain white onesies from WalMart (prefer Carters brand) but I really like to hit up Goodwill, too. Their baby clothes are always 99 cents a piece and it's easy to find ones in good repair.  I think since babies usually have sooo many clothes, and grow so fast, they end up outgrowing their clothes before they can do much damage to them, making them ideal to buy second hand! 

Plain onesie in good repair from Goodwill
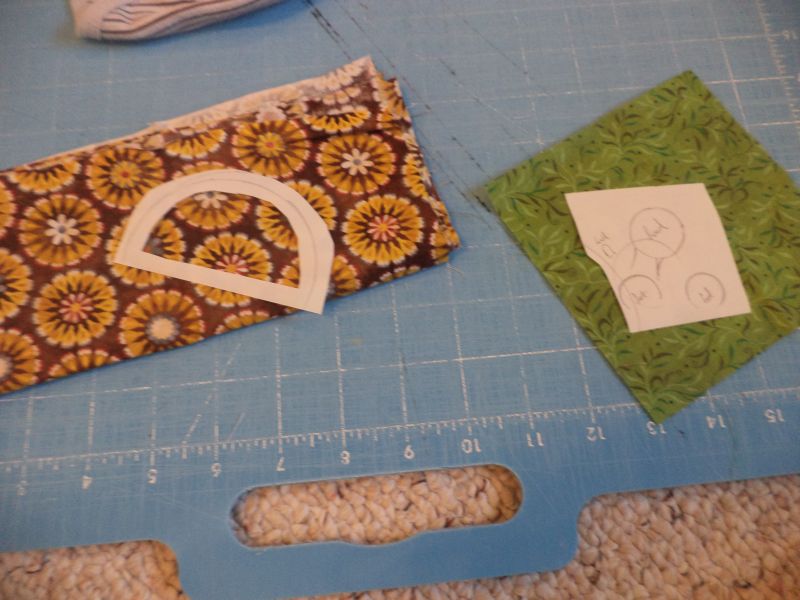
You need to decide on a design that you like. In this case, I wanted something that would go with the colors on the onesie (mostly brown) and would be wide enough to cover the label that was on the chest.  Google is a great place to start looking for ideas. In this case I chose a turtle. 

Design components sketched onto iron-on
Sketch the components of your design onto the paper side of lite iron-on adhesive.  No need to erase stray lines as the paper ends up getting thrown away anyway. For my turtle I needed a shell, head, 2 legs, and a tail.  I used a compass (like from geometry) to get the curves for my pieces.  I've noticed that almost anything looks more baby-ish if you exaggerate the roundness of it.  Bear in mind that if your design is directional it will end up reversed from your sketch.

Fabric selections from scraps
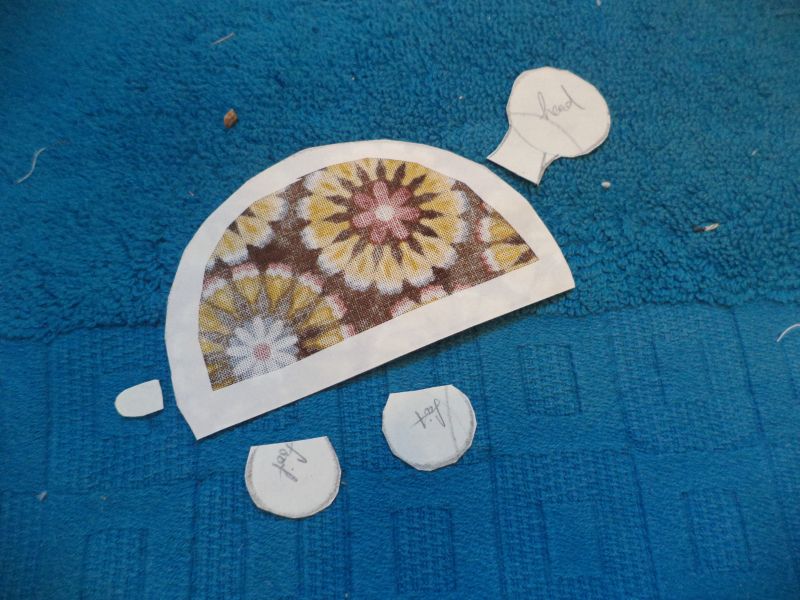
Cut out your pieces leaving about a 1/4" extra to the outside of the lines. For the large enough pieces, also cut out the inside about a 1/4" from the line. This cuts down on stiffness and weight in the final design.  For pieces that are all going to be in the same fabric (like my head, legs, and tail) there is no need to cut the individual pieces apart.  Next, dig into your scraps and find the perfect colors :)

Apply iron-on to wrong side of fabric
Following the package directions, iron the adhesive onto the wrong side of your fabrics.  Trim around the individual pieces.  This is why we didn't trim all the way down to the lines earlier, so now we can get a nice clean line with the adhesive going all the way to the edge.

Trim the individual components
Layout the components (mine are upside down above) and play with their placement until you are satisfied with the design.

Peel the papers away and iron the components in place
Peel away the backing papers and place the fabrics onto the onesie, overlapping slightly where necessary. Then, iron them in place according to the package directions of your adhesive.

Blanket stitch in a coordinating color to make everything secure
Finally, since babies can deal out a lot of abuse and baby clothes generally don't get washed on the 'gentle' cycle, I use my machine to blanket stitch everything in place with coordinating thread colors.  This is also a great time to add embellishments. Buttons are obviously a no-no, but ribbons can be a great addition.

All done, and much improved!
Wash the onesie before you give it away to make sure nothing moves and, ta-dah! All done!

Saturday, July 6, 2013

"It's a Girl!" baby gifts

My friends are having a girl!  I've been making embellished onesies, baby pants, and receiving blankets for expectant moms for a while now, but it seems like almost everyone is having boys.  That works well for me since I generally like boy stuff better, and my stash is full of boy fabrics, but it was fun to finally get to make some little girl things.


I made my usual set of 3 onesies. I buy plain white onesies and applique on them.  I like the Carters brand because they feel softer, thicker and generally better made than Gerbers.


 I usually get at least size 3-6 month because some babies and born already too large for newborn clothes, and this way they can wear them longer.


These are so easy to make, and turn out so cute!  [Edited to add, I decided to write a full tutorial for these. You can find it here.]  I start by sketching my design onto the paper side of Lite Iron-on adhesive.  I cut out the pieces about a quarter inch to either side of my lines, leaving the middle empty. This way there is only a strip of the iron-on along the edges of the design, making it lighter and more flexible.


I iron the adhesive onto fabric scraps, trim along the line to make it the right shape, then peel off the paper and iron it down to the onesie.  I use a machine blanket-stitch to secure everything so it will last through many washes.


I also made some more Big Butt Baby Pants. My first girly pair :)  I used a natural colored linen for the main piece of the pants and a cute, pink print with animals for the rear panel and ruffles.  The ruffles around the ankles give just the right girly touch and pink top-stitching finishes everything off perfectly.


I also made two quick receiving blankets from some white thermal knit and pink jersey sheet set.  I make these pillowcase-style and just top-stitch around the edge once they are flipped and closed.  A few stars or circles in the middle to hold the layers together and these generously sized blankets are all ready for baby.

Baby set: quilt, 2 receiving blankets, pants, 3 onesies

Of course, every baby needs a quilt. So, the Pink Lemonade scrap will also be going with this set to its new home.  Sewing for babies is SO much fun, and so are the babies themselves, except possibly for the cat of the house.  My friends' kitty is about to get a rude awakening, so I made up a quick-and-dirty cat toy to send along, too.  New babies are hard on kitties :/

This is a kitty who doesn't know a thing about babies and NOT being the center of mommy's attention
The sewing is all done, not we're ready to meet the sweet new little person!

You can find the full tutorial for the onesies here.

Linking up to Finish it Friday @ Crazy Mom Quilts.

Thursday, May 30, 2013

(Finally!) Finished Friday


Whoo hoo!! It's Friday and I finally have something finished!  These two baby quilts (36"x40" each) have been in progress for far too long.  But, they finally got done this week and both are getting shipped off tomorrow to their new homes.


This quilt, which I'm calling Toppled Coins was the one I set out to make.  I started it sometime in early May and it was on and off the design wall, rearranged and reconsidered until inspiration finally struck.  Angling the blocks in the stacks gave the quilt what it was missing before.  (I made a mini-tutorial for the technique I used in this post.)


I love the way the random criss-cross quilting came out; I have been waiting for just the right quilt to use it on.  The majority of the blues in this quilt were cut from scraps, so this made a great scrap-buster project.  It was a lot of fun to chose little boy-friendly fabrics.  Pirates and paper hats and robots!  There are scraps from the Lizzy House Constellations line, too, some of my very favorites.

Photo was taken before, but it got a light grey polka dot binding

This quilt is a bonus quilt! I got a little overzealous in my cutting for Toppled Coins, and some of the colors didn't play well with the other, so I had leftovers. I strips pieced the leftovers into long strings, sliced them to a common length, and sashed them with the same grey used in the other quilt.  Quick, easy, and looks great.  Best of all, just as I was finishing it I heard about a newborn little boy in need to a quilt :)  I did simple straight-line quilting on this one; I felt like it complimented the design.


Both quilts are back with the same pretty blue linen.  I'm so excited to finally have some finishes and to send them to their new homes!  In addition to a quilt, I'm sending some clothes for the new baby.  Fist of all I made some more appliqued onesies. These are so easy, yet they have a lot of impact.


I am stuck with a nautical theme for these.  I also ventured into making baby pants with a cute green plaid and some corduroy scraps.


I bought the pdf pattern for these Big Butt Baby Pants from Rae and it works like a charm! The pants took no time at all to make and they're adorable.  I made these in size 0-3 months to match the onesies.

Big Butt Baby Pants Butt :)

I also got the Architextures top finished this week, but I won't subject you to another picture of that WIP ;) I hope your week was as productive as mine!  Linking up to Finish it Friday at Crazy Mom Quilts.