Showing posts with label life. Show all posts

Thursday, January 2, 2014

2013 Retrospetive

Happy New Year everyone!


2013 was a great year for quilting here at Kat and Cat Quilts :)  Here are the stats, this year I finished:
28 quilts
3 wall hangings
6 bags

You can see most of my finished projects under the Finished Quilts tab at the top of the page. I also made major progress learning to FMQ, which was last year's New Years Resolution.  Here's hoping next year bring even more quilt-y finishes :)

(Mosaic made with BigHugeLabs Mosaic Maker. You should check it out!)

Wednesday, August 7, 2013

One step forward, Two steps back


So this is what I've been doing in my evenings this week.  I have a couple of partially-quilted quilts which became UFOs because I began quilting them and then realized my plans weren't going to work.  Un-sewing is not my preferred way to spend my sewing time, (hence these have been sitting idle for a while... months?) but it's the perfect way to spend an evening when you're exhausted and just want to watch TV and do something mindless with your hands.

Tomorrow I'll have the post up about finishing the sail boat quilt :) Happy Hump Day!

Thursday, July 25, 2013

What I did on my day off...

Tomorrow starts a 3-day weekend of 12-hour shifts, so I had a long list of things I wanted to get to today before I headed back to work.  I have plenty of UFOs that need to be worked on, so what did I do? Started a new project, naturally!!

Chain piecing like the wind!
I decided to make a throw quilt based on this one at Blue Elephant Stitches.  The biggest change I made was to make the boat's hull out of one piece so that I could showcase some novelty fabrics.  These cute little sail boats will be perfect for two little boys :)

Brights fabric selections

I selected my fabrics and cut them last night.  I went with my usual method of making two HSTs at a time by cutting squares and sewing on either side of the center diagonal. (Method #2 here.)  Making the hull pieces yielded 2 bonus HSTs per boat. I am thinking about using these as corner stones in the sashing, or else on the back.

Hulls and HSTs

Each boat gets 6 little HST sails.


Lots of sewing, pressing, and cutting and at the end of the day I have a stack of 16 cute little boats!


Can't wait until Monday when I can get back to work on this one. I have promised myself that this will not become another UFO :/


Yesterday was my last day at the job I've had for over 2 years at the embroidery shop.  I took the opportunity to make a few more embroidered panels for quilt backs.  These feature a poem that's been on the side of our refrigerator my whole life.  I made 5 in various colors.

"Cleaning and scrubbing
can wait 'til tomorrow
for babies grow up
we've learned to our sorrow

So quiet down cobwebs
dust go to sleep
I'm rocking my baby
and babies don't keep" 
 
Wilson had a rough day

Speaking of babies, Wilson had a rough day. (His least favorite parts by far were my attempts to give him Benadryl.) I think he got stung by a wasp or a bee; his face was swollen up like a chipmunk. I was worried about his breathing with so much swelling around his airway, especially since he is always so congested with his allergies already and gets winded easily.

a better picture of the swelling
Fortunately, he seems to be fine and by dinner the swelling had started to go down.   So the kitty is well, the laundry is done, a new project is well on its way and I guess everything is ready for me to go back to work tomorrow :)

Tuesday, July 9, 2013

Pieced Badge Cover: Mid-week Project


I started my first nursing job this week.  A lot of nurses decorate their badge clips and I thought, why not a quilted badge?  I hope it will be a good conversation starter with some of my patients who may also be quilters or live with a quilter :)


I decided on a Dutchman's puzzle block and used paper and foundation piecing both to make it.  Obviously there are some wonkiness issues, but as the entire design measures just 1.5" I'm okay with that.   After piecing together the top I cut the piece to a circle and added elastic to make it wrap around the badge base.


Here's what my badge clip looks like from the back.  The fabric comes around the edges of the base and the elastic pulls it in close behind it.  I can't wait to wear it to work :)

Linking up to WIP Wednesday.

Saturday, June 22, 2013

Sunday Catch-up

Hello! It's been a whole week since I posted. My family went on vacation to New Mexico this past week to enjoy to desert in all its natural glory :) 

White Sands National Monument at sunset
Despite being gone most of the week, I did accomplish some sewing before we left that I'll be blogging about soon.

The Kitchen Mesa hike, aka, "The big one"
After I get some rest and recover a bit.

Nothing says "welcome back to Texas" like a full garden!
I am making pepper vinegar and pepper jelly with out excess of Cayennes and the tomatoes we can't eat will be frozen.  If anyone has any other suggestions for preserving these veggies I'd appreciate them :)

Practicing spiral quilting on a scrappy quilt
I made a couple of baby quilts from my scraps last weekend. I decided to use the manageable size to tackle some quilting techniques I've wanted to try. The girl quilt got a tight spiral.  I was pleasantly surprised with how easily the spiral went on and the lack to wrinkles or pulling.  I'll be using this technique on a larger quilt soon.


The other thing I have to tell you about is the upcoming Pets On Quilts quilt show at Lily Pad Quilting!  This online quilt show will feature photos of pets on quilts as well as quilts about pets and some great pet-themed quilty prizes.  As regular readers will know, this is pretty much an entire blog of cats-on-quilts pictures, so I can hardly wait for the linky to open up!

Thursday, January 31, 2013

Stash Bee, Hive #3 February

This month is my month to be the Queen Bee of my Hive in the Stash Bee; I've been participating in this bee since about this time last year. I thought it would be fun to post my introduction and block here as well.

Hello Hive #3!  I'm so excited that it's finally February.  I have to say, I've been enjoying this Bee immensely and sewing up all the fun blocks that you guys have chosen.  I hope you like the block I've picked for this month.  So, on to the getting-to-know-you bit.


Hiking at White Sand in New Mexico
My name is Kat and I live in North-East Texas with my cat-allergic cat, Wilson.  I am currently in nursing school; I should graduate in May and become an RN.  I'm hoping to get a job in a trauma ICU, then later move on to Mercy Ships.  In between school and quilting I enjoy traveling, sailing, and working backstage on community theatre shows.


Crewing on the Hawaiian Chieftain
My day job currently is working at a t-shirt shop where I run a large embroidery machine.  It's a thread-happy job but not the same as quilting, for sure. I also work periodically as a dresser on touring Broadway shows when they come through our area, most recently West Side Story.

Wilson: Chief Quilt Inspector
The hardest quilt I have ever made would either be the Carpenter's Star I made last Christmas with it's insane number of Y-seams, or the Ocean Waves quilt this Christmas, which was a pure endurance challenge.  Both of these were more traditional designs which are not my norm.  The majority of my quilts are distinctly modern and I prefer to create my own designs rather than following a pattern.  Still, if I had it to do over I'd make these both the same way again.


The Carpenter's Star with its happy recipient
My mom originally turned me loose with a sewing machine and some general direction when I was around 8.  I think the first thing I made was a pillow.  I sewed occasionally until I was 21 when I began teaching myself to quilt on a whim.  I've learned to quilt through a combination of trial and error, consulting the internet, and observing the experts.

Action kitty Wilson pounces the krinkly ball
My favorite dessert food is dark chocolate... any kind, really.  As far as baked goods go, probably sweet potato pie.  I'm a good southerner like that.  The last time I laughed really hard was at my cat, Wilson, doing acrobatics chasing after a krinkly ball.
Finding joy in a very special little boy discovering cotton candy

My life philosophy is tricky to answer, but I think it would be: be joyful!  Find your joy in every situation, because it is there.

The Block 

The block I've chosen for this month is the modern bargello block introduced by Amy in the Something New Sampler.  Her tutorial is here.  I've had a long time to think about, and change my mind about my block, but when I saw this I knew it was the one.  

Amy's Block
The only (potential) change from her tutorial is size.  The tutorial makes a 14.5" x 7.5" block. I am asking for a block 13.5" wide by at least 7.5" tall. I noticed that I had a hard time getting mine to 14.5" inches wide so I'm giving you an inch more wiggle room in your trimming. 

You can make your block in any height you choose as long as it's at least 7.5".  To increase the height just cut your original strips longer where she cuts hers to 12".  I cut one set of mine to 20.5" and the final block was 14.5" long, the other set I cut to 24.5" and it ended up 17".  

You can also mix up the number/widths of your strips at the beginning as long as their width after they're sewn together but before you sew them into a tube measures at least/about 15".  

Amy specifies to press all the seams open but it isn't important to me whether you do or not.

My blocks
I am asking for blocks in blue, grey, and purple with pops of red and yellow. Please use a mix of solids and prints.  For the background use a solid of either blue, grey, or purple. 

I kept my bargello waves pretty tight, but feel free to make their sweeps more dramatic.  I can't wait to see all your different blocks! I am the opposite of a perfectionist so please don't sweat it if your block ends up a little small or something.  Make another if you feel like you should, but send along the wonky one, too. I'll make it work :) 

I am asking for one large or two small blocks (I'll leave it up to you to determine what sizes qualify) but of course if you want to make more I'll be thrilled.

If you'd like to send a signature block please sign a 5.5" x 3.5" solid color block.  

Thanks everyone! I hope that is all the info you need but please email me with any questions and I will do my best to answer. 

Sunday, November 11, 2012

Merry and Bright

Yes I know it's early, but I was in the mood to get in the attic and drag everything out, so I figured I'd better take advantage of it.  The past several years we haven't had a shred of Christmas decoration because we've all been so tired by the time the holidays come, the last thing we want to do it go to the trouble of decorating.  This year though I've made up my mind: We are going to participate in Christmas, lights and tree and all.  I got out one of our antique quits to use as a tree skirt and Wilson has already made himself at home under the tree.  So, here's hoping all is well where you are and all is Merry and Bright :)

Wednesday, October 31, 2012

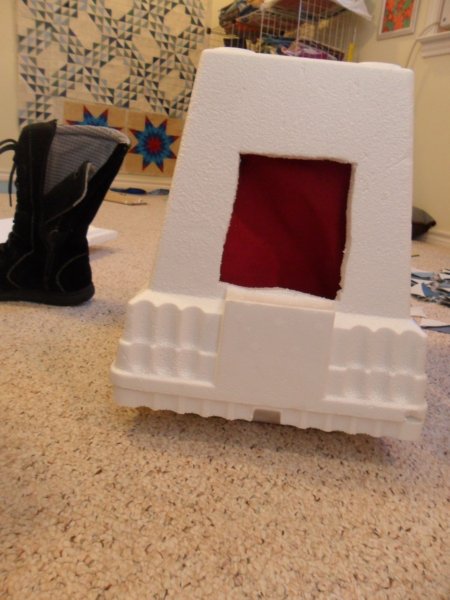
Homemade, cheap, warm winter boxes for outside cats

Well, it's that time of year again. When we worry about our outside animals and whether they're warm enough. We have quite a few porch cats and in years past we've set up a sort of kitty condo of stacked crates and blankets, but this year I decided to try something different for them. I heard about this cheap, simple solution from a family member and I have to say, it was as easy and cheap as promised and the cats love it. So, without further ado, here is my tutorial for making a cat igloo.
Step 1: Cut a hole in the box

First you need to get one of those small, cheap Styrofoam ice chests. I don't know what size this one is, but it says it holds 24 cans and it cost about 2 bucks. Using a sharp knife cut a hole in one of the short ends of the ice chest. Cut the smallest hole you think your cat can fit through. I would recommend starting out with a hole you think is too small because you can always enlarge it later. The smaller the hole, the less cold air will be leaking in.
Step 2: Add a door flap
Next, you can add a door flap if you want a little extra cold-security. I used a slice from the leg of some coveralls with a layer of batting in the middle.  Make it just wider than your hole and long enough to hang a few inches past it, then glue it (I used hot glue) to the bottom of the ice chest below the hole (this will be the top of the finished cat igloo, so the flap will hang down).  
Step 3: Glue on the lid and flip the box over.
Next, using hot glue or another glue (not superglue, it melts Styrofoam), attach the ice chest's lid.  Flip the whole box over and, ta-da! It's a cat igloo!  I stuffed an old cushions through the door hole to pad the bottom of the box.
Step 4: Set in a sheltered place
Now all you have to do is set out your cat igloos in a sheltered place and introduce them to the local cats. Ours weren't too sure about the whole thing until it got pretty cold; now they're in there every night!  I've checked the temperature in the box when one of our cats was inside and it was nice and warm, even when it was near freezing outside.

I've seen similar ideas for colder climates that involved encasing a Styrofoam cooler inside a large plastic tub with a lid and packing straw (for insulation) between the two boxes.  Cut a hole through both boxes to make a doorway and you're all set.

Hope this helps somebody!

PS: I am up to 58 blocks out of 72 done on the Ocean Waves quilt!!

Monday, August 27, 2012

I'm Back! What a summer!


I took off on May 12th for an adventure filled summer. This is the backpack I lived out of for over 3 months, waiting in the terminal for my first set of flights to Eugene, OR. My rule this summer was to only travel to places where it was cooler than Texas (let's be honest, it doesn't take much).
Photo by Bob Harbison
I spent 7 weeks sailing on the Hawaiian Chieftain, the same boat I was on 2 years ago.  I was with them going north along the Oregon coast as well as in the Puget Sound.  The boats are operated by Grey's Harbor Historical Seaport Authority.  There's a great article here on our organization's educational program.

Chieftain's stack going under the bridge in Newport, OR.
After spending 3 weeks onboard Chieftain in Oregon I flew to Santa Fe, NM to tutor with a family for 7 weeks.  They treated me as a member of the family and showed me all the best adventures there are to see and do in New Mexico.  It was an incredible opportunity and I was blessed to have it.

Beginning our hike to sleep on the dunes at White Sands, NM
One of the best experiences I had in New Mexico was camping out on the dunes at White Sands.  We hiked in around 6pm, had a picnic, and threw our sleeping bags on the sand to watch the stars.
White Sands, NM.  I am the farthest ahead in the center.

Me, in a kiva at Bandelier National Monument.

A sunset picnic on top of a cabin on the Sandia crest, playing "airplane" with a very special little girl.
After 7 weeks in Santa Fe it was back to Washington to sail for another month.  The weather was pleasant, and at times even warm, and of course the scenery was beautiful.  We sailed around the Puget Sound and I was heartbroken to leave!
Mt. Baker, seen from somewhere near Anacortes, WA.
Through a combination of getting things done ahead of time and a few miracles I managed to stay on top of my Stash Bee blocks all summer, but that was the only sewing that got done.  Now that I am home regular programming has resumed.  I am back in school and already quilting again.  I have a list of quilts to get done by Christmas, one of which already became a top this week.  I'll post pictures soon.

I can't say I'm glad to be back, but I am glad to be quilting again :)
The harbor in Blaine, WA at sunset.

Thursday, April 12, 2012

Pet Peeves: How a quilt is like a sports car

Photo from homeautodesign.com
I just have to rant a little bit; tell me someone else is with me here!  (I'll explain the photo of the Veyron, just stick with me.) My number one quilting pet peeve (well, one of the top 5 at least) is seeing quilts hung on a wall, on display, instead of in use!

Now, don't get me wrong, some quilts are MADE to be display quilts and many quilters (myself included) have more quilts than we know what to do with and so keep some of them on rotation on display when all the beds are covered.  It's better than having them folded in a closet.  What I'm talking about is when a quilt is being hung on a wall because it's "too pretty to use" or "I'm afraid to mess it up."  What?

Quilts are MADE to be used.  They are made to be loved and cuddled.  Quilts are for spring time picnics and mid-winter snuggling on the couch with the dogs, and for comforting vomit-y children.  A few stains, tears, or worn patches on a quilt are well-earned battle scars.  Like laugh-lines on a face, they're evidence of a life well-lived.


Photo from automotivecarpictures.blogspot.com
Hanging a quilt on a wall is like having a really beautiful, fancy sports car and never taking it out of the garage.  Sure, it's pretty to look at, but if you never take it out for a drive and put your foot down it doesn't get to do what it was made to do.  And that's really a tragedy!

I feel the same way about seeing quilts hanging on the wall.  Yes, they're pretty.  They make great wall art.  But they're not getting to do what they were made to do. 

I always tell people when I give away a quilt: Use it!  If your quilt gets dirty, you can throw it in the washing machine.  If it gets worn beyond use, I'll make you a new one.  Nothing would make me happier than to know that one of my quilts was literally worn to pieces.

Hanging a quilt on the wall or folding it in a closet or otherwise coddling it to "save it" is a crime. Like people, quilts need to live fulfilled lives.  So please, people of the world, stop this travesty, USE your quilts.

Monday, August 30, 2010

Photos of Summer

I went to summer camp with this cutie. He is happy, talkative, and VERY active!

With the return to classes and the search for a real job my desire to quilt has returned as well. I spent tonight drawing out a paper piecing pattern (the old fashioned way, with a pencil and ruler) for a mariner's compass quilt and I'm going shopping tomorrow. Before I dive back into quilting related posts, I want to dedicate this post to some photos from my summer. It's been one to remember.


For the end of July and beginning of August I spent 3 weeks crewing on the tall ship Hawaiian Chieftain in the Puget Sound. The Chieftain is on the right in this photo, the Lady Washington on the left. I really enjoyed wearing jackets and longsleeves during what are the hottest 3 weeks of the year for Texas.


Back tomorrow with quilting news!

Monday, May 10, 2010

In flux...


Things are a mess around here. I am in the process of packing up my room, and even though I left my sewing machine and a couple of projects unpacked I haven't sat down to sew in several days. Since I don't have anything new to show I'm posting a picture of a little table topper I made long, looong ago when I needed to practice the concepts of quilting and binding before I finished of my first quilt. It was free pieced with scraps and then densely quilted. There are a few rather pathetic attempts at free motion quilting, but I quickly switched to straight lines and quilted over them. It is about 15" square. I had forgotten about it until I cleared off my desk to pack things up. This time next week I'll be settled again, see you then :-)