Friday, May 31, 2013

Feline Friday: Kitty Kaps Update

Elvis "helping" me take new pictures of a wallhanging
It's been a while since I've made a Feline Friday post.  At first I didn't really have anything to say... then I was out of town and then my camera broke.


But! This week I wanted to post some cute new pictures and give you all an update on Wilson's Kitty Kaps.  I first posted about these claw-covers here, and I believe I promised an update on how they stood up over time.

Calley says "What's your problem?"
Looking at the date on that blog, I put these on 6 weeks ago. As of today Wilson has 3 of the original 10 Kaps remaining, but they didn't really start to come off until last week.  I applied new Kaps (grey this time) earlier this week and they went on ever easier than before.  I am so impressed with this product!

Wilson snoring away and modeling his Kitty Kaps

A $15 kit has enough Kaps to cover his nails 4 times. At about 6 weeks per application that means one box lasts about 5 months!


Finally, I had to include a picture of the little ferret girl, even if she isn't strictly feline.  This was the best picture I could get; inevitably with I always get pictures of where she used to be.

Linking up to all the handsome kitties at Feline Friday.

Thursday, May 30, 2013

(Finally!) Finished Friday


Whoo hoo!! It's Friday and I finally have something finished!  These two baby quilts (36"x40" each) have been in progress for far too long.  But, they finally got done this week and both are getting shipped off tomorrow to their new homes.


This quilt, which I'm calling Toppled Coins was the one I set out to make.  I started it sometime in early May and it was on and off the design wall, rearranged and reconsidered until inspiration finally struck.  Angling the blocks in the stacks gave the quilt what it was missing before.  (I made a mini-tutorial for the technique I used in this post.)


I love the way the random criss-cross quilting came out; I have been waiting for just the right quilt to use it on.  The majority of the blues in this quilt were cut from scraps, so this made a great scrap-buster project.  It was a lot of fun to chose little boy-friendly fabrics.  Pirates and paper hats and robots!  There are scraps from the Lizzy House Constellations line, too, some of my very favorites.

Photo was taken before, but it got a light grey polka dot binding

This quilt is a bonus quilt! I got a little overzealous in my cutting for Toppled Coins, and some of the colors didn't play well with the other, so I had leftovers. I strips pieced the leftovers into long strings, sliced them to a common length, and sashed them with the same grey used in the other quilt.  Quick, easy, and looks great.  Best of all, just as I was finishing it I heard about a newborn little boy in need to a quilt :)  I did simple straight-line quilting on this one; I felt like it complimented the design.


Both quilts are back with the same pretty blue linen.  I'm so excited to finally have some finishes and to send them to their new homes!  In addition to a quilt, I'm sending some clothes for the new baby.  Fist of all I made some more appliqued onesies. These are so easy, yet they have a lot of impact.


I am stuck with a nautical theme for these.  I also ventured into making baby pants with a cute green plaid and some corduroy scraps.


I bought the pdf pattern for these Big Butt Baby Pants from Rae and it works like a charm! The pants took no time at all to make and they're adorable.  I made these in size 0-3 months to match the onesies.

Big Butt Baby Pants Butt :)

I also got the Architextures top finished this week, but I won't subject you to another picture of that WIP ;) I hope your week was as productive as mine!  Linking up to Finish it Friday at Crazy Mom Quilts.

Tuesday, May 28, 2013

WIP Wednesday: Finish-a-thon (with a binding tutorial)

Sometimes you lose your sewing mojo... and sometimes you find it! I made the most of my long memorial day weekend sewing. Somehow I've gotten into a state of having a ton of active WIPs and very few finishes (not like me). So, my goal this weekend was to finish something.

Toppled Coins + Bonus Quilt
Success! These two baby quilts were finished today (the one on the right now has binding).  The quilt on the left is Toppled Coins, which I've been working on for a while; the one on the right is a bonus quilt made from all the extra blocks I had accidentally cut for the first quilt!  Both will be shipping out to little boys soon.  There will be more details on these in this week's Friday Finishes post.

A pic of the final layout
The next project was my Architextures quilt. This one had been taken off the design wall and carefully stacked until I was ready to work on it again.  I made some tweaks to the layout to allow more of the same colors to touch before beginning to sew it together.  When I join lots of small blocks like these I don't like to do them in rows.  I find it's much easier to ease in those small inconsistencies and make all the points meet if I build them into larger and larger square blocks.  Hopefully I can get this one the rest of the way together tomorrow.

Crappy night time photo. Sewing the top together, in progress.

For binding the second baby quilt today I opted to use an alternative binding method that I occasionally use when I want to be frugal with my binding fabric.  I went ahead and took some pictures so I could explain it here.

To determine the width of binding to cut, take the width you normally cut your binding to (2.25" in my case) divide it in half, and add back 0.25".  This means I cut my binding to 1 3/8", nearly an inch of fabric saved for every strip of binding. 


Now the tricky part (but you only have to do it once.) Inset both ends of a needle in your ironing board cover so that the gap under the needle is equal to the first number you got above (before you added 0.25") or half your normal binding width.  Once you've got the needle in place you can leave it here and forget about it, it doesn't affect your normal ironing.


To make the binding you insert the end of the binding under the needle, rolling one edge over about a quarter inch so that the strip just fits in the space under the needle.  As you pull on the strip it should naturally roll over on that edge and you'll iron the crease in place as the binding comes out the other side of the needle.  I am right handed, so I pull from the left.  When I get in a groove I use my left hand to pull slowly and iron with my right at the same time.  It barely takes any longer than ironing normal double fold binding.


Attach the binding the same way you normally would, attaching the unfolded edge first.  I machine sew to the back, wrap the binding around and machine sew on the fold to the front.

I have heard people say that one of the important things about double-fold binding is that it protects the edge of the quilt, which receives the most wear in use.  It is true that this single thickness binding may wear faster; just something to consider when choosing a technique.  Like I said, I mostly only use this technique when I won't have enough fabric for binding cutting the normal width.


And some gratuitous pictures of my quilting companions.  These two are constantly in and out and around my feet while I am working.  This was the best picture I could get of the ferret.  When I try to take pictures of her I mostly get pictures of where she used to be.


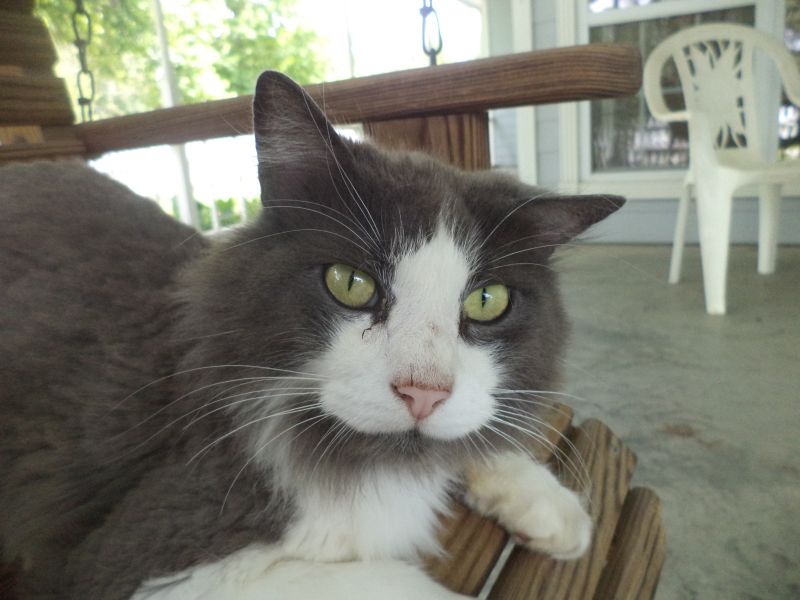
Mr. Wilson, snoring away in kitty heaven.  His Kitty Kaps are holding up nicely.  I put the first set on well over a month ago and half of them are still in place.  We are definitely fans of this product!

Whew, it was a busy weekend!  In case you couldn't tell from all the pictures I also replaced my broken camera.  I was able to score a refurbished display model on sale from Best Buy and it's even nicer than my old one.

I am linking up to WIP Wednesday. Happy Hump day everyone!

Sunday, May 19, 2013

A Name and a Mini-Tutorial

Hello! It's Design Wall Monday again and I am back in Texas. I've made a little progress on the blue and black quilt and, perhaps most importantly, decided on a name. I'm calling it Toppled Coins.


The blocks on the right are barely begun, the blocks on the lower left are on step two, and the blocks on the upper left are finished.  I am happy with this design direction and feeling excited to get the top done now!

I went ahead and took some pictures for a mini-tutorial about the technique I am using. Apologies in advance for the crappy phone photos; I broke my camera on my last evening in California.

Step 1: Cut your color blocks to various heights and widths.  (As with all the blocks on the right side of the design wall). Keeping the heights standardized will make things much easier; all my blocks were either 3.5", 4.5", or 5.5" tall.


Step 2:  Cut strips from your background fabric corresponding to the heights you used.  Sew a background strip to a colored block at both ends to make a loop as shown above.


Step 3:  Fold the loop in half on the color block.  If you want the color block to be centered you'll need to match you seams. I let my seams be slightly offset.  Divide the width you want for your finished block in half to determine how to trim.  I wanted 12.5" finished blocks, so I trimmed away the extra background fabric at 6.25" from the folded edge.  Continue using the strip of background fabric until it gets too short to use.


Step 4:  Line up two blocks and over lap them 1" to 2" (as shown above.)


Step 5: Line up your ruler diagonally from corner to corner where the blocks are overlapped and cut through both blocks.


Step 6:  Sew the blocks together.  Repeat all steps.  I'm alternating the direction of my slant every blocks, but you could try something different.


I hope you're having a happy Monday!  If you have time go check out everyone else at Design Wall Monday or entries for The Blogger's Quilt Festival.  Mine are here (Two-Color Quilt) and here (Scrap Quilt).  Remember, voting starts Friday :)

The last photo my camera took :( At least it was a good one!

Friday, May 17, 2013

Salt Water {Blogger's Quilt Festival}


Hello, and welcome to the Blogger's Quilt Festival! This is my entry for the Two-Color quilt category.  The Salt Water quilt is a traditional Ocean Waves design made from scraps of blue and white remnants.   This quilt was a numbers game, ending up with (864) 2" HSTs to make a 64"x72" quilt.


I opted to quilt it with wave-like wobbly lines.  The quilting helped to smooth out the lines of the design and to keep the many seams of this quilt in check.  The blues in the top of this quilt came exclusively from remnants I have collected over the years. I was amazed at how small of a dent it made in my overflowing stash of blues.


For the backing I found a couple of novelty sailing fabrics on sale. I didn't have enough to cover whole thing, so the backing is pieced. The recipient of this quilt is a sailor, so this fabric was perfect for him.


The blues include a variety of prints and solids, including a couple of shot cottons and a light denim.  I had enough of the denim left to make the perfect binding from.


I was able to sew up this label for the back with a classic quote. It says, "The cure for anything is salt water- sweat, tears, or the sea."  You can read more about this quilt and the process of making it here.


Thanks for visiting, be sure to check out the other entrants at the quilt festival and vote for your favorites.  You can also see my other entry in the scrap quilt category here.  Enjoy the festival!

Shrapnel {Blogger's Quilt Festival}


It's that time of the year again, The Blogger's Quilt Festival!  This time we can enter two quilts in different categories.  This is my entry for the scrap quilts category, Shrapnel.  The name refers to the triangular scraps the quilt is made from, because essentially scraps are quilting shrapnel :)


This is my version of Amanda Jean's "Up Up and Away" quilt in the book Sunday Morning Quilts.  I keep a jar of triangular scraps on my desk.  Mainly there are the 2.5" triangles left over from making binding, but there are also lots of other odd sized triangles.  I and was astonished to find that my scrap jar provided more than enough triangles for the quilt! No square, rectangular, or otherwise useable scraps were harmed in the making of this quilt.


Due to the many seam lines and geometric nature of the design I opted to straight line quilted horizontally and vertically parallel to the seam lines.  The fabrics in this quilt are a complete mix of color and textures from most every project I've ever made. Making it was a trip down memory lane :)  The quilt is 64" square and contains over 900 triangles.


Read more about this quilt here and here.  I am entering this quilt in the Scrap Quilts category at the Blogger's Quilt Festival. You can also see my other entry in the two-color quilt category here.  Be sure to go check out all the other entrants and vote for your favorite!

Finish it Friday: The Avocado Hoodie

Today's finish is a very special one for me: my first clothing item! I found the Avocado hoodie pattern during the Sew Mama Sew giveaways and decided to give it a try.  I brought my finished hoodie with me this week to California to take pictures of it in action.


The pattern was for the most part clear and easy to follow (obviously I managed to make a decently successful hoodie from it). I would attribute my difficulties with a few areas within the pattern to the fact that I had never read a clothing pattern before and just didn't know what some of the terms meant.


I did make a few changes to the pattern and once I hunt down some different fabric and remake it I will make more changes.  I want to make the body and arms a bit longer. I lined the hood with a cute jersey fabric and made the cuffs from the same jersey I used in the pocket.  Some of the neat features about this pattern are the pocket tabs that stick out, the optional overlapping hood and thumb holes in the cuffs.


The hoodie fits great, although it is a little short. I estimate that I lost 3" in length to my own mistakes pattern-reading.  I'm anxious to find the perfect fabric and start on hoodie version 2.0!

You can buy the Avocado hoodie pattern here.

Linking to Finish it Friday.

Tuesday, May 14, 2013

WIP Wednesday: Stacked Quilt


This quilt has been evolving for a while.  It is for my cousin's 1 yr old little boy.   At first I was planning to just stack the blocks in columns as you see them, on a grey background. But.... it just isn't working for me. I think I need to be more discriminating about which blues and blacks make the cut for the stacks. Also,  I think I am going to stack the blocks on angles instead of straight to give the quilt more interest.

Unfrotunately (or actually, fortunately) I am on vacation in California this week, the only downside being  no access to my sewing machine.  Back in a week!  :)
Redwoods

Linking to WIP Wednesday at Freshly Pieced.