Hello! It's that time of year again, for those of us who only wish we were in Houston to celebrate the Blogger's Quilt Festival! This is my third time to participate. Thanks so much to Amy for hosting :)
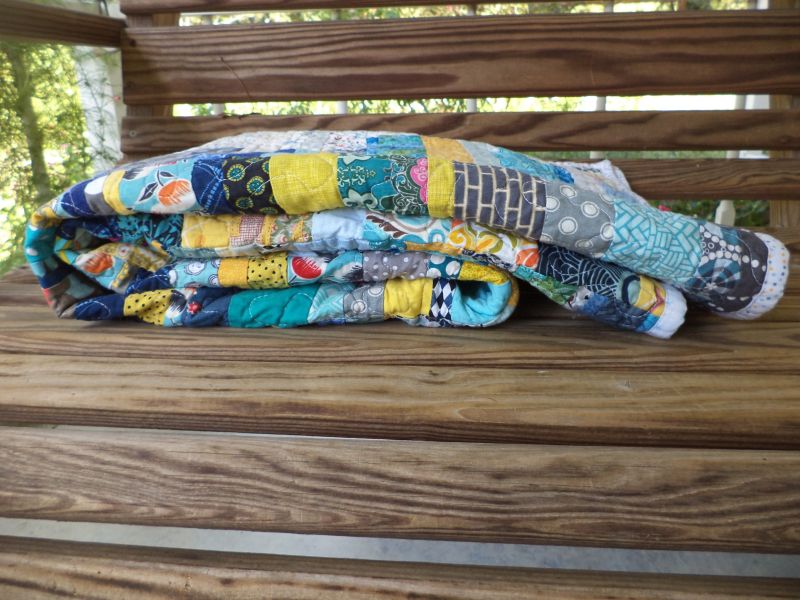
I am entering Springtime Riot in the Bee quilt category. I joined the Nurture circle of do. Good Stitches in February and working with these ladies has been the most wonderful experience! The level of commitment and skill is far beyond what I had experienced in previous bees and most of all, it's just a lot of fun making quilts for charity.
Springtime Riot was my second quilt to design as the group quilter. Scrap quilts are my preferred style, and I'd been on a bit of a string quilt kick, so I designed this block for the group.
The finished quilt turned out better than, I think, any of us had hoped. I loved seeing all the cute fabrics hidden in those busy blocks!
I quilted the quilt on my home machine with a loose stipple. You can't beat a good stipple for fresh-from-the-dryer krinkle factor.
I opted to keep the binding low volume and machine sewed it down to both sides. Our group donates our quilts to My Very Own Blanket, a charity the provides quilts to kids in foster care. So I wanted this quilt to be able to stand up to a lot of love and abuse.
A couple of the ladies in our group have confessed, after the quilt was done, that they had had doubts as they were making their blocks but were won over by the final project. I think that is one of the best parts of bees: making something as a group that is greater than the sum of its parts.
The quilt got an appropriately riotous IKEA backing and a label under the binding before shipping out.
Thanks and major kudos, as always, to the ladies of the Nurture circle. I can't wait until January when we start quilting again!
I am entering this quilt in the Bee quilt category of the Blogger's Quilt Festival. Be sure to check out all the entries. And visit my other entry in the baby quilt category here.
Showing posts with label springtime riot. Show all posts
Friday, October 25, 2013
Thursday, September 12, 2013
Springtime Riot {do. Good Stitches August Quilt}
The August quilt from the Nurture Circle of do. Good Stitches is done! I am so impressed with the ladies this month for getting their blocks done so quickly and making such fantastic blocks!! My work schedule looks pretty nasty for the next month and a half, but
since everyone was so on the ball I was able to take advantage of my
last long weekend to get this baby done.
You can see the tutorial I asked the ladies to follow here. I asked for two-tone string blocks of blue/yellow/grey and low volume fabrics. Everyone did such a good job of picking lovely, modern, fun fabrics for their blocks. It's no secret that I love a scrappy quilt and this one is just exceptionally nice. I enjoyed finding new favorite fabrics in every block as I was quilting it.
I decided to stipple the quilt because I felt like it needed some curvy, free motion quilting to not compete with the straight lines of the strings. It also needed something fairly dense to reinforce all those seams and tame the seam allowances.
My FMQ has come a long way since it was my New Years Resolution 9 months ago (9? Seriously, where does the time go?!). I still have plenty to learn, of course. Some of my curves are not as smooth as I would like, and I had to cross over myself in a few places.
I decided to go low-volume for the binding. I had the perfect blue and yellow polka dot fabric in my stash already. I didn't have quite enough, so I made up the difference with another soft white and blue fabric. I machine sewed both sides of the binding for strength and speed.
As you know I like to name my quilts. This one was a little stubborn. The colors and patterns together are so riotous, so I was thinking about String Riot. From there I got to Springtime Riot, because of the spring-y colors.
I used Hobbs Heirloom Natural cotton batting. I love that batting, it keeps the quilt very light and with a nice drape even with such heavy quilting. I had this IKEA fabric in my stash, which made the perfect backing. Added a label under the binding and this quilt is ready to go to a new home. We send our quilts to "My Very Own Blanket" a charity which gives quilts to children in foster care.
With (20) 12.5" blocks the quilt finished at 48"x60" before washing. I'm sure it's a bit smaller now since it crinkled up so nicely after a wash and dry. I'll be getting this little quilt in the mail to its new home soon, where it will be on to the arms of a child. I admit, it's more difficult than usual to let this one go :) It's become a personal favorite.
Thanks you Nurture Circle ladies!! You made another wonderful quilt.
I'm linking up to Finish it Friday @ Crazy Mom Quilts.
You can see the tutorial I asked the ladies to follow here. I asked for two-tone string blocks of blue/yellow/grey and low volume fabrics. Everyone did such a good job of picking lovely, modern, fun fabrics for their blocks. It's no secret that I love a scrappy quilt and this one is just exceptionally nice. I enjoyed finding new favorite fabrics in every block as I was quilting it.
I decided to stipple the quilt because I felt like it needed some curvy, free motion quilting to not compete with the straight lines of the strings. It also needed something fairly dense to reinforce all those seams and tame the seam allowances.
My FMQ has come a long way since it was my New Years Resolution 9 months ago (9? Seriously, where does the time go?!). I still have plenty to learn, of course. Some of my curves are not as smooth as I would like, and I had to cross over myself in a few places.
I decided to go low-volume for the binding. I had the perfect blue and yellow polka dot fabric in my stash already. I didn't have quite enough, so I made up the difference with another soft white and blue fabric. I machine sewed both sides of the binding for strength and speed.
As you know I like to name my quilts. This one was a little stubborn. The colors and patterns together are so riotous, so I was thinking about String Riot. From there I got to Springtime Riot, because of the spring-y colors.
I used Hobbs Heirloom Natural cotton batting. I love that batting, it keeps the quilt very light and with a nice drape even with such heavy quilting. I had this IKEA fabric in my stash, which made the perfect backing. Added a label under the binding and this quilt is ready to go to a new home. We send our quilts to "My Very Own Blanket" a charity which gives quilts to children in foster care.
With (20) 12.5" blocks the quilt finished at 48"x60" before washing. I'm sure it's a bit smaller now since it crinkled up so nicely after a wash and dry. I'll be getting this little quilt in the mail to its new home soon, where it will be on to the arms of a child. I admit, it's more difficult than usual to let this one go :) It's become a personal favorite.
Thanks you Nurture Circle ladies!! You made another wonderful quilt.
I'm linking up to Finish it Friday @ Crazy Mom Quilts.
Sunday, September 8, 2013
Progress!
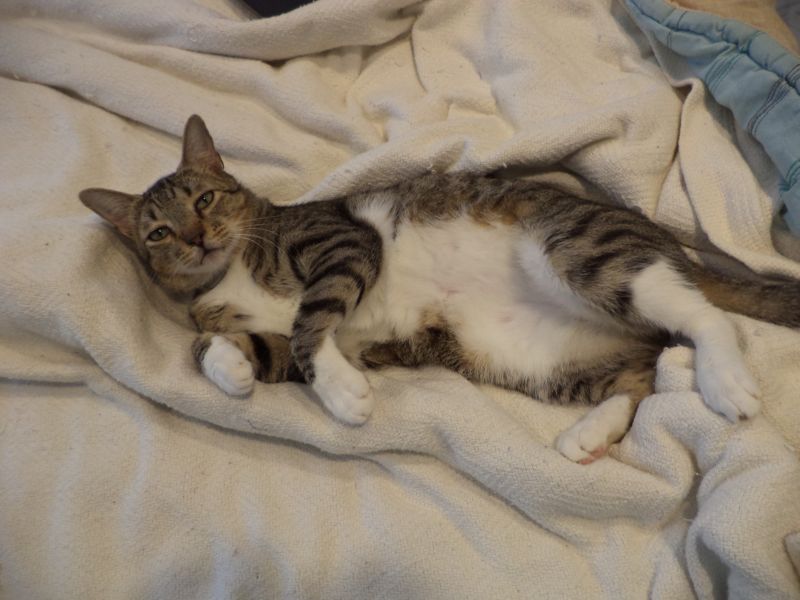
I think I've finally gotten a handle on my problem with sleeping the weekends away. Wilson, of course, continued as per usual :)
I made great progress on the NURTURE circle of do. Good Stitches August quilt this weekend. You can expect and finish post on Friday about that one :)
Based on a suggestion I read online somewhere I tried wrapping my binding around a spare spool and sticking it on the bobbing winding peg on top of my machine. Worked like a charm! Much better than my usual method of stringing binding across the floor to keep it from tangling :)
I also got September's blocks done for do. Good Stitches. These scrappy stash-buster blocks used (136) 1.5" squares but somehow hardly made a dent in my crumbs jar! They were a lot of fun to make, anyway. Maybe this is how I can use up all those crumbs one of these days.
Close up of one of the blocks. These tiny square finish at 1", so fun to fussy cut! I feel like that owl is disapproving of the monkey.
On the design wall, the improv monkey quilt continues to grow. Up to 5 blocks done out of 12. This one is so much fun. Each 16" block is like a mini quilt to plan and sew. Keeping the cuts of fabric large is making it go pretty quickly. Looking forward to getting it finished.
Last but certainly not least, my door prize from The 2013 Pets on Quilts Show arrived!! 40 delicious 10" batik squares. Thanks so so much to Hoffman fabrics and Snoodlz at Lily Pad Quilting. You can see my entry to the show here
.
Whew! Finally, a productive weekend! I'm linking up to design wall Monday at Patchwork Times. Be sure to see what everyone else has going on there.
I made great progress on the NURTURE circle of do. Good Stitches August quilt this weekend. You can expect and finish post on Friday about that one :)
Based on a suggestion I read online somewhere I tried wrapping my binding around a spare spool and sticking it on the bobbing winding peg on top of my machine. Worked like a charm! Much better than my usual method of stringing binding across the floor to keep it from tangling :)
I also got September's blocks done for do. Good Stitches. These scrappy stash-buster blocks used (136) 1.5" squares but somehow hardly made a dent in my crumbs jar! They were a lot of fun to make, anyway. Maybe this is how I can use up all those crumbs one of these days.
Close up of one of the blocks. These tiny square finish at 1", so fun to fussy cut! I feel like that owl is disapproving of the monkey.
On the design wall, the improv monkey quilt continues to grow. Up to 5 blocks done out of 12. This one is so much fun. Each 16" block is like a mini quilt to plan and sew. Keeping the cuts of fabric large is making it go pretty quickly. Looking forward to getting it finished.
Last but certainly not least, my door prize from The 2013 Pets on Quilts Show arrived!! 40 delicious 10" batik squares. Thanks so so much to Hoffman fabrics and Snoodlz at Lily Pad Quilting. You can see my entry to the show here
.
Whew! Finally, a productive weekend! I'm linking up to design wall Monday at Patchwork Times. Be sure to see what everyone else has going on there.
Tuesday, September 3, 2013
Wednesday WIPs
I was hoping for a finish during this break, but some progress will have to do. I quilted some more on the bird houses quilt but it's no much to look at, so no pictures. Hopefully I will have that one done soon. It's so small, there's really no excuse not to! Well, there is this adorable face who is always snoozing in my bed. Makes it that much harder to not just throw in the towel and take a nap.
I started a new top using my old, coveted sock monkey fabrics. I need a dozen 16" square blocks. One block down, eleven to go! I am piecing these together improv style with no particular pattern. I am planning to stick to 90 degree corners and bright, child-friendly fabrics.
Major props to the girls of the Nurture circle at do. Good Stitches for getting all their August blocks to me in record time! I am missing one person's blocks, but since two people made extra I have all the blocks I need to start putting the top together.
Linking up to WIP Wednesday.
I started a new top using my old, coveted sock monkey fabrics. I need a dozen 16" square blocks. One block down, eleven to go! I am piecing these together improv style with no particular pattern. I am planning to stick to 90 degree corners and bright, child-friendly fabrics.
Major props to the girls of the Nurture circle at do. Good Stitches for getting all their August blocks to me in record time! I am missing one person's blocks, but since two people made extra I have all the blocks I need to start putting the top together.
Linking up to WIP Wednesday.
Monday, August 26, 2013
Bee Blocks on the Design Wall
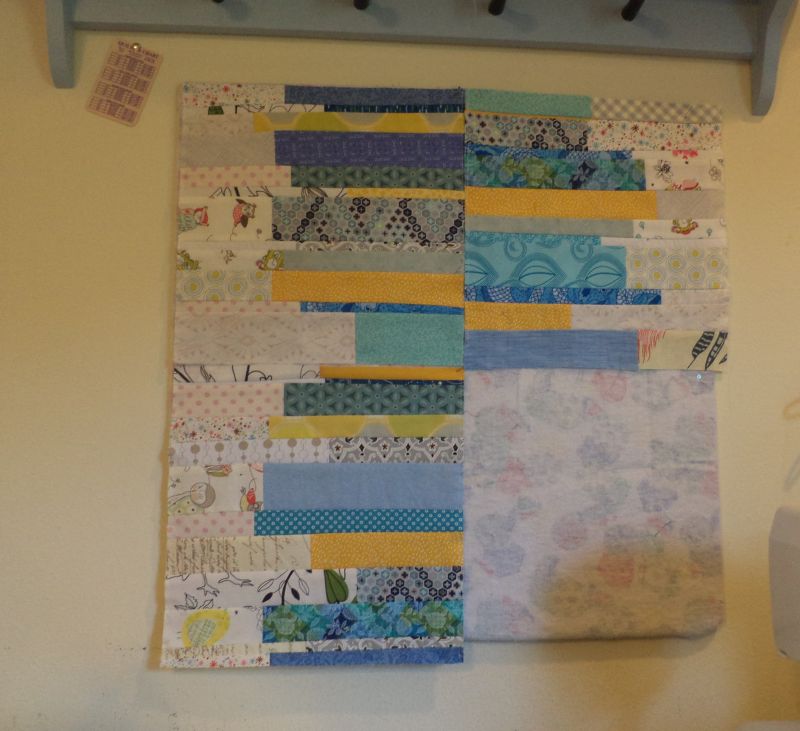
Hello Monday :) Here's a quick look at what's on my design wall. Blocks from the August do. Good Stitches Nurture circle continue to arrive!
Linking up to Design Wall Monday at Patchwork Times.
![]() |
| The blocks so far. I am aiming for a 4x5 layout |
![]() |
| I love that text fabric with the curving words |
![]() |
| That grey and teal fabric with the birds may be my favorite in quilt so far |
Monday, August 12, 2013
Design Wall Monday: Strings
It's Design Wall Monday again and this week I have the latest do. Good Stitches blocks on my wall. I am the quilter for this month and asked for two-tone string blocks. You can see the tutorial here. I can't wait for more blocks to get here so I can start putting them together.
My plans for today include continuing work on quilting the Bird Houses quilt and possibly starting a new WIP (you know, cause I need one more thing going!)
In other news, Wilson modeled one of my tie-dye onesies. It was a bit big; apparently he's a 3-6mo cat. (I know, it's amazing he puts up with me, right?)
Linking up to Design Wall Monday at Patchwork Times.
Tuesday, July 30, 2013
August do. Good Stitches String Blocks
Hello Good Stitchers! It's my month as quilter for the Nurture circle again. I know I gave you guys a pretty easy, quick block back in May, so maybe you can forgive me for this month's block being a little more intense ;) Honestly, I got my blocks done in a couple hours, so I don't think you'll have too much trouble.
This month we are making scrap string blocks with blues, grey, yellow, and low volume fabrics. I'm including another palette to give you color ideas, but unlike last time you don't need to worry about sticking really close to the particular hues, it's just to give you a jumping off point.
I'm so glad Louise introduced low volume fabrics to our group in last month's block (here's a handy link to her tutorial with explanation.) I had already been planning to do this block and struggling with how to best explain them, and she did a great job! Louise's post illustrates a technique for trialing your low volume fabrics using a camera. I talk about a few other techniques here. Whatever works for you, works for me!
So, step 1 for this block is to get into your strings and pull the colors you need. Look at the blocks I made in the first picture on this page for a guide to your color selections. For the "focus" strings we are going for all shades of blue and teal (minus super bright, primary color blue), a little bit of grey, and a little bit of yellow. When choosing these fabrics please think of a more grown up, slightly "mellow" palette rather than a bright, juvenile one. (I hope that makes sense.) You'll also need low volume fabrics for the "background" strings. Try to choose almost all prints, but you can throw in a few solids, too.
Get into your scraps and make a mess! "Strings" in quilting means a lot of different things to different people, but for purposes of this project a string is a piece of fabric that is between 0.75" and 2.5" wide and at least 4.5" long unfinished (but usually much longer). When I pull fabrics for a scrap project I dump out the appropriate scrap container and sort it. In this initial sort I am usually not too picky, pulling anything that looks like it might work. Then I can pick out the best fabrics when I get to sewing.
Step 2 is to start sewing! Match colored and low volume strings of approximately the same width (you may have to trim one of them a bit), making sure that the combined length of the two strips will add up to at least 13", and sew them together along their short end. Remember, scrap quilting is all about making do with what you have, so try to avoid cutting new strings for this project. After sewing trim the new, combined string to about 13" (err to the side of too long, rather than too short).
Once you have sewn up a handful of strips take some time to iron them, pressing the seam toward the darker fabric. You can start putting them up on the design wall at this point and playing with them. The determine how many you need to make arrange the strings in a stack so that their edges just touch and measure the height. Subtract 0.5" x the number of horizontal seams (one less than the total number of strings) to get the height that your block/column would be if you sewed them together. Since I am asking for (2) 12.5" blocks you'll need to have a column of at least 25" finished.
Step 3 is to step back and admire your work. Once you've sewn up a bunch of strings is a good time to take a break. I like to leave these up on my design wall for a while so I can look at them throughout the day. Each time you see them is an opportunity for things that don't blend well to jump out at you. Since we're working for scraps it's likely that some of your fabrics just won't "go" with the rest of them once you see them all together. That's totally fine! Just pull them out and back in the scrap box they go.
Up close, scrap projects like this can look busy and messy. It's hard to see the design and nothing looks like it goes! Getting some distance is a good way to see the big picture. Another thing I like to do is look at the wall with my glasses off. Usually, the colors that don't belong immediately become obvious. Since I know that everyone is not (ahem) blessed with being horribly near sighted I tweaked one of the pictures I took to show you what I see.
See that teal and grey string in the lower left that's jumping out in the pic above? The grey is too dark, it's not reading as white. The string group looked much better with that one gone, but I probably never would have noticed it if I hadn't done the glasses-off test. (For those of you not blessed with myopia, my mother says you can get this same effect by crossing your eyes a little bit, kind of like how you do those Magic Eye illusions.)
Once you are happy with the colors of your strings step 4 is to start sewing them together, keeping the darks on one side and lights on the other. Remember we are basically going for a random look, so don't stress too much about the order. I recommend sewing all your strings into one long column and then cutting your 12.5" blocks from it.
You can press as you go if you feel like you need to, but I don't think it's necessary to press until you're done with this step. Also, please don't press the seams open. In this kind of quilt I worry that it will make the seams more likely to split. Don't stress about seams that aren't perfectly straight, trust me, it will look GREAT all together and you'll never notice.
Step 5, you're practically done! After ironing your column of strings, line up your ruler with the horizontal seams and cut (2) 12.5" blocks from it. If your column was more than a couple inches too long, don't hesitate to send along the extra as well :) To protect your blocks during shipping and assembly please sew a line of stay-stitching about 1/8" from the edge on the sides with many seams. And that's it! Thank you for helping to make what I think will be a stunning quilt!
![]() |
| I got so excited, I made 3 of them! |
(Edit: See the finished quilt here!)
This month we are making scrap string blocks with blues, grey, yellow, and low volume fabrics. I'm including another palette to give you color ideas, but unlike last time you don't need to worry about sticking really close to the particular hues, it's just to give you a jumping off point.
I'm so glad Louise introduced low volume fabrics to our group in last month's block (here's a handy link to her tutorial with explanation.) I had already been planning to do this block and struggling with how to best explain them, and she did a great job! Louise's post illustrates a technique for trialing your low volume fabrics using a camera. I talk about a few other techniques here. Whatever works for you, works for me!
So, step 1 for this block is to get into your strings and pull the colors you need. Look at the blocks I made in the first picture on this page for a guide to your color selections. For the "focus" strings we are going for all shades of blue and teal (minus super bright, primary color blue), a little bit of grey, and a little bit of yellow. When choosing these fabrics please think of a more grown up, slightly "mellow" palette rather than a bright, juvenile one. (I hope that makes sense.) You'll also need low volume fabrics for the "background" strings. Try to choose almost all prints, but you can throw in a few solids, too.
![]() |
| Making a mess is the first step in scrap quilting |
Get into your scraps and make a mess! "Strings" in quilting means a lot of different things to different people, but for purposes of this project a string is a piece of fabric that is between 0.75" and 2.5" wide and at least 4.5" long unfinished (but usually much longer). When I pull fabrics for a scrap project I dump out the appropriate scrap container and sort it. In this initial sort I am usually not too picky, pulling anything that looks like it might work. Then I can pick out the best fabrics when I get to sewing.
![]() |
| The white piece will need to be trimmed a bit, but the two together easily add up to 13" long. |
![]() |
| Match strings of the same width and sew along the short end |
Step 3 is to step back and admire your work. Once you've sewn up a bunch of strings is a good time to take a break. I like to leave these up on my design wall for a while so I can look at them throughout the day. Each time you see them is an opportunity for things that don't blend well to jump out at you. Since we're working for scraps it's likely that some of your fabrics just won't "go" with the rest of them once you see them all together. That's totally fine! Just pull them out and back in the scrap box they go.
Up close, scrap projects like this can look busy and messy. It's hard to see the design and nothing looks like it goes! Getting some distance is a good way to see the big picture. Another thing I like to do is look at the wall with my glasses off. Usually, the colors that don't belong immediately become obvious. Since I know that everyone is not (ahem) blessed with being horribly near sighted I tweaked one of the pictures I took to show you what I see.
![]() |
| The nearsighted quilter's design wall :) |
Once you are happy with the colors of your strings step 4 is to start sewing them together, keeping the darks on one side and lights on the other. Remember we are basically going for a random look, so don't stress too much about the order. I recommend sewing all your strings into one long column and then cutting your 12.5" blocks from it.
You can press as you go if you feel like you need to, but I don't think it's necessary to press until you're done with this step. Also, please don't press the seams open. In this kind of quilt I worry that it will make the seams more likely to split. Don't stress about seams that aren't perfectly straight, trust me, it will look GREAT all together and you'll never notice.
![]() |
| Stay-stitched to keep the edges from unraveling |
![]() |
| 3 string blocks on the wall |
(Edit: See the finished quilt here!)
Subscribe to:
Posts (Atom)