After finishing the Ocean Waves flimsy I had the itch bad to piece something quick and simple. So, Sunday I whipped up this sweet little baby quilt. I've had most of these fabrics forever. One of the rare times I bought several cuts from the same fabric line that all went together. Having stared at them long enough, I decided it was finally time to do something about it.
The focal fabric is this great bird print with teals, oranges, and greens. I cut the focal fabric into large squares and cut rectangles from the coordinates plus some additional fabrics from my stash. It's undeniably girly, but NOT pink and purple. I love that. I'm planning to put this one in my Etsy shop when it's done.
It measures 54" square and I can't tell you how good it felt to finish a top in a day!
Thursday, November 8, 2012
Sunday, November 4, 2012
I did it!!
From a bin full of HSTs to a completed top, 2016 pieces later, Ocean Waves is finally a flimsy! By the time I realized how insane this project was I was already too far in to quit. My plan to finish was to get done before I could realize how overwhelming the amount of piecing was.
| 864 HSTs ready to become a top |
![]() |
| A shot of part of the back |
The next step is putting together the back and layering for quilting. Fortunately, I am planning a simple, quick quilting pattern for this monster!
Wednesday, October 31, 2012
Homemade, cheap, warm winter boxes for outside cats
Well, it's that time of year again. When we worry about our outside animals and whether they're warm enough. We have quite a few porch cats and in years past we've set up a sort of kitty condo of stacked crates and blankets, but this year I decided to try something different for them. I heard about this cheap, simple solution from a family member and I have to say, it was as easy and cheap as promised and the cats love it. So, without further ado, here is my tutorial for making a cat igloo.
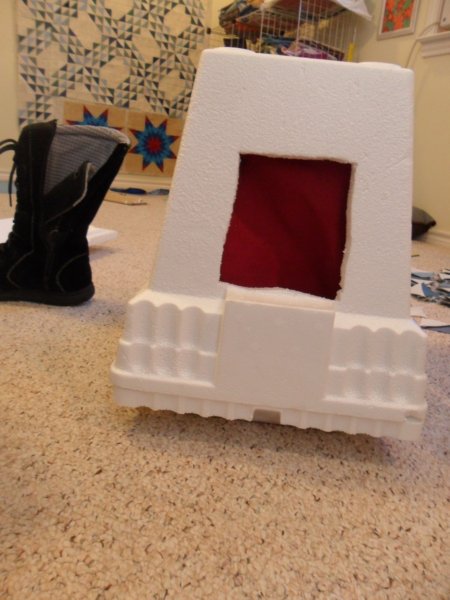
First you need to get one of those small, cheap Styrofoam ice chests. I don't know what size this one is, but it says it holds 24 cans and it cost about 2 bucks. Using a sharp knife cut a hole in one of the short ends of the ice chest. Cut the smallest hole you think your cat can fit through. I would recommend starting out with a hole you think is too small because you can always enlarge it later. The smaller the hole, the less cold air will be leaking in.
Next, you can add a door flap if you want a little extra cold-security. I used a slice from the leg of some coveralls with a layer of batting in the middle. Make it just wider than your hole and long enough to hang a few inches past it, then glue it (I used hot glue) to the bottom of the ice chest below the hole (this will be the top of the finished cat igloo, so the flap will hang down).
Next, using hot glue or another glue (not superglue, it melts Styrofoam), attach the ice chest's lid. Flip the whole box over and, ta-da! It's a cat igloo! I stuffed an old cushions through the door hole to pad the bottom of the box.
Now all you have to do is set out your cat igloos in a sheltered place and introduce them to the local cats. Ours weren't too sure about the whole thing until it got pretty cold; now they're in there every night! I've checked the temperature in the box when one of our cats was inside and it was nice and warm, even when it was near freezing outside.
I've seen similar ideas for colder climates that involved encasing a Styrofoam cooler inside a large plastic tub with a lid and packing straw (for insulation) between the two boxes. Cut a hole through both boxes to make a doorway and you're all set.
Hope this helps somebody!
PS: I am up to 58 blocks out of 72 done on the Ocean Waves quilt!!
| Step 1: Cut a hole in the box |
First you need to get one of those small, cheap Styrofoam ice chests. I don't know what size this one is, but it says it holds 24 cans and it cost about 2 bucks. Using a sharp knife cut a hole in one of the short ends of the ice chest. Cut the smallest hole you think your cat can fit through. I would recommend starting out with a hole you think is too small because you can always enlarge it later. The smaller the hole, the less cold air will be leaking in.
| Step 2: Add a door flap |
| Step 3: Glue on the lid and flip the box over. |
| Step 4: Set in a sheltered place |
I've seen similar ideas for colder climates that involved encasing a Styrofoam cooler inside a large plastic tub with a lid and packing straw (for insulation) between the two boxes. Cut a hole through both boxes to make a doorway and you're all set.
Hope this helps somebody!
PS: I am up to 58 blocks out of 72 done on the Ocean Waves quilt!!
Monday, October 29, 2012
My points match! (mostly)
| Bit of a blurry picture but it shows the true colors |
I got the task of making the two lonestar blocks we need, mainly because no one else wanted to volunteer for them. The quilter who is in charge of the whole project has, to say the least, a different quilting style than me. She's one of those quilters whose points all match and who never have a clashing color in their quilts. I was worried if I would be able to make my blocks up to her standards, but I have to say I'm pleasantly surprised. Still not sure if it will be good enough for her, but I'm impressed.
| The view from the back. I pressed all the seams open to reduce bulk. |
Saturday, October 27, 2012
Blogger's Quilt Festival: Harley Memory Quilt
![]() |
| Quilt Festival! |
| The finished memory quilt |
![]() |
| The original pile of "source material" |
I designed the final layout using 12"x14" big blocks with a 5"x14" strip beside them which could be subdivided as I needed. The sashing around the big blocks is 2" wide and the sashing within the blocks is 1" wide. I sketched the layout and played with the random arrangement of the big blocks until I was happy with them.
| Motorcycle boxers cut along the seams and stabilized with iron-on backing. |
The camo background on the front of the quilt all came from one camo shirt. I used patches that included the pockets, buttons, and tags to preserve the character of the clothing.
| These buttons can be unbuttoned to reveal the small motorcycle print from the boxers underneath. |
| The camo at the top is the shoulder panel from the back of the shirt, complete with pleats. |
| The back of the quilt, using up leftovers. |
| A tag from one of the T-shirts |
| Wilson: Quilt Inspector |
| Focusing on the details |
| My Uncle Steve |
Suicide is a real thing. It happens. We need to talk about it to spread awareness and reduce the stigma of seeking help. There is help out there; no one is alone. If you need help, call: Suicide Hotline Directory.
Blogger’s Quilt Festival Stats
Finished quilt measures : 60″x 70″
Special techniques used : applique,peek-through fabrics behind buttons
Quilted by : myself
Best Category : Scrap Quilt, Throw Quilt, Home Machine Quilted
entry # 310
entry # 310
Read more posts about this quilt here.
Friday, October 26, 2012
I sold a quilt!
I sold a quilt! This quilt, in fact. One half of the New Wave set. To say I was excited would be an understatement. I feel like a "real" quilter now.
Not too long ago I revamped my Etsy shop and listed a few of my homeless quilts for sale. Like most quilters, I give almost all of my quilts away. Most of them are destined for a particular home before I even start on them. The time and effort I pour into making a quilt that I hope the owner will enjoy are a dedication to that person. Most people have never had a quilt that was made just for them and I earnestly hope that every quilt I give will be loved and enjoyed in its new home.
I had held off on trying to sell any of my "extra" quilts because I was afraid it would feel impersonal, to sell something that really ought to be a gift. But... The piles of quilts around the house were getting out of hand and I could use some extra funds. Besides, I hate having homeless quilts sitting around. Quilts need to have a home and a purpose, they aren't made to it on a shelf. So, I listed three quilt for sale and after a few weeks this one sold.
I was surprised, although maybe I shouldn't be, that I feel just as excited for this quilt to go to its new owner, a stranger, as I do when I give a quilt to a friend! I can't wait for it to arrive at its new home and for them to enjoy it. Rather than feeling like I sold a quilt, I feel like it was adopted. My homeless quilt has a home, where it will be loved for years to come. Can anyone else identify with this feeling?
Not too long ago I revamped my Etsy shop and listed a few of my homeless quilts for sale. Like most quilters, I give almost all of my quilts away. Most of them are destined for a particular home before I even start on them. The time and effort I pour into making a quilt that I hope the owner will enjoy are a dedication to that person. Most people have never had a quilt that was made just for them and I earnestly hope that every quilt I give will be loved and enjoyed in its new home.
I had held off on trying to sell any of my "extra" quilts because I was afraid it would feel impersonal, to sell something that really ought to be a gift. But... The piles of quilts around the house were getting out of hand and I could use some extra funds. Besides, I hate having homeless quilts sitting around. Quilts need to have a home and a purpose, they aren't made to it on a shelf. So, I listed three quilt for sale and after a few weeks this one sold.
I was surprised, although maybe I shouldn't be, that I feel just as excited for this quilt to go to its new owner, a stranger, as I do when I give a quilt to a friend! I can't wait for it to arrive at its new home and for them to enjoy it. Rather than feeling like I sold a quilt, I feel like it was adopted. My homeless quilt has a home, where it will be loved for years to come. Can anyone else identify with this feeling?
Wednesday, October 24, 2012
Subscribe to:
Posts (Atom)