Sunday, March 17, 2013

Design Wall Monday


I'm trying something new, linking up to Design Wall Monday at Patchwork Times.  The so-far-unnamed animal quilt top is on the wall.   This is going to be a really busy week at school for me (and therefor a slow sewing week) so I will probably get to stare at it all week and contemplate quilting.  It is going to be for an drawing, which I'll tell you more about later, so I do have a deadline, but I still have some time.


Seismic, my stash bee quilt, has now grown to the point that it has graduated to the "design floor" because that's the only way I can see the whole things at once.  I broke up the cheddar sashing with a really dark blue and it helped the top a lot.  I think this one might be done; I really don't think it needs borders.  In any case it's going to be a while before I get around to basting it, so I have lots of time to decide if it needs more.

Saturday, March 16, 2013

Quick and Dirty Cat Toy Tutorial

As you know, we're a bunch of sophisticated kitties around here. So, in the grand tradition of the outdoor Cat Igloo I bring you, the Quick and Dirty Cat Toy! These take no time at all to make and all of our cats go nuts for them. 


So, here's what you're going to need:  an old sock (preferably one with the heel worn through that you really ought to stop wearing anyway), loose cat nip, some worn out cat toys (noise makers are good), and miscellaneous ribbon scraps for the tail.  You could do this with just the sock and catnip, the rest is just extra.

Supplies

Step 1: Fold down the sock and pour some catnip into the toe. I used about a tablespoon, but the amount isn't very important.  Then shove in your cat toys and work everything tightly down into the toe.


Step 2: Line the sock up on your machine and sew a couple times across to keep everything sealed in the toe.  Using a zipper foot makes this easier if you have trouble. Remember-- it's a cat toy; you want to keep the cat nip contained, but otherwise neatness does not count!


Step 3: Fold a few lengths of ribbon in half and poke their raw ends up inside the sock, against the seam you just sewed.  Sew a couple more times across the sock about a half inch from the first seam line to be sure you catch the ends of the ribbon firmly.


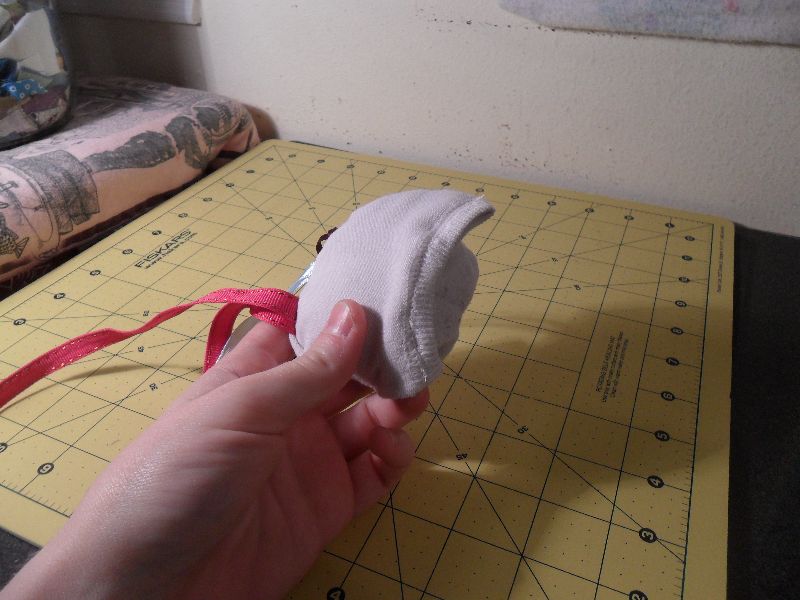
At this point your sock toy should look like this:


Step 4: Fold the open end of the sock down and around the toe.  This will make the toy tougher for when your kitties try to kill it.  Match up the sides of the cuff and sew across them. Again a zipper foot helps but isn't at all necessary.


Ta-da! You should have a double-layered, catnip filled, kitty ball of delight, complete with a tail. 


Present it to your favorite feline and proceed to annoy him by taking his picture.


Thursday, March 14, 2013

Finish: Counting Elephants

Counting elephants.  Because counting sheep is soooo pedestrian. 


This quilt was supposed to be a baby size when I started, I swear.  I seem to have some kind of mental block about small quilts.  This quilt was born on a lazy Saturday afternoon of improv piecing with no plan in mind.  I added strips, decided to make it symmetrical, added solids to the end of strips that were too short, until I ended up with a quilt 42"x67".

LOVE these tiny elephants! I'm going to need to get some more.

...Yep, that's a little long and skinny.  It looked like a beach towel. Going to need some borders and call it a twin size, so off I rushed to the fabric store, because of course I didn't have enough of any black and white fabric to border it. I made it there 5 minutes to close and found the perfect fabric.  I don't know how Loretta does it, but she packs the best fabrics into her tiny store.

Elephant Run by Tina Givens.  Look at those whimsical little elephant riders!!

I know every quilt is my new favorite, but I really love this one! The colors are so different from what you usually see and it was so much fun to pull favorites from my stash.  It all started with that Elephant Run fabric from Tina Givens that I bought on Etsy, I just picked fabrics that complemented it.  I used up the last of a few of my old favorites in this one.
That ornate black and white print on either side of the numbers strip has been a favorite of mine since my very first quilts.  This used up the last of it besides tiny scraps.

The idea to include a strip of the IKEA numbers fabric came out of nowhere, but ended up being the centerpiece of the quilt.  I was pleased to find a strip that included the all important number: 42.  That, along with the dream-y quality of the elephant rider fabric gave me the idea for the name of this quilt.  Can't you just see a little adventurer falling asleep, counting elephants?

The backing used up two of my favorite IKEA prints.  (We made a trip to IKEA earlier this week so I was able to restock.)  After making the front two-tone it seemed appropriate to keep the back to the same color scheme.

The quilting is horizontal in the center section to emphasize the stripes. I did the same thing in the borders, but vertical. I felt like straight line quilting was the only choice for this quilt, with all the stripes on the front.


I didn't get a close up picture of the binding, but I tried Cheryl Arkinson's technique to joining it at the corners so that I could have green binding on the sides and black on the top and bottom. I can't say I would try it again unless I was just desperate to get that effect of two colors at the corner. The corners were extremely bulky and hard to work with and seemed to be too big? I had to create pleats to get the corner to fold over the top. That said, they look pretty good now that it's done, and I do love the effect.

Isn't this IKEA print the best? I couldn't find any more of it at the store so I'll have to horde what I have left.
This quilt will be going to live with a friend from school and her family who are having a rough time.  I she'll really appreciate to different-ness of it.


Linking up to Amanda Jean's Finish it Friday.

PS: My finger is healing nicely (had an incident with the rotary cuter a week ago). Thanks for all the well wishes :)

Tuesday, March 12, 2013

WIP Wednesday: Seismic


Ok, so no awards for my photography tonight.  I am worn out! These are my blocks from the Stash Bee up on the design wall.  There is one more column of blocks which won't fit on the wall; it goes to the right of these.  This is going to be large quilt.  On the order of 80" square all told.  Many thanks to my bee members who sent so many great blocks!  I've decided to name it Seismic Waves.

I am conflicted about the sashing on these...  I though golden yellow was going to be the right choice for uniting all the different blocks, but it looks awfully cheddar.  I think I am going to cap the columns off and border the whole thing in a really nice dark blue to hopefully chill it out.  We'll see if that works.  Any suggestions? Any one?


Linking up to WIP Wednesday, check it out!

Monday, March 11, 2013

Quilt-Cat Cuteness

Just because it's Monday and we all need some cat pictures in our day.

"Helping" me quilt. 
Wilson, aka Mr. Wilson, Wilson-Wilson, aka Willaby, aka Willie B., aka "Cuddles" (said sarcastically).  Chief Quilt Inspector at Kat and Cat quilts takes his job very seriously.  He doesn't take "No, you can't lie there," for an answer.

Talking to the birds out the window
I finally took his hint and rearranged the top of this shelf to give him a place to lie in the sun and snooze.

"Helping" quilt again, and taking a bath on my quilt!
Read more about Wilson, the amazing cat-allergic cat, here.

Thursday, March 7, 2013

One-Day Baby Quilt

Last week, in the midst of preparing for the other baby shower my mom asked me to make something for a friend of hers who is ALSO have a little boy.  How could I say no?

Yup, it's still windy here


I decided on a simple layout of 5" squares.  I cut 6 squares each out of 8 different fabrics. The baby's mama likes neutrals so I pulled a selection with tans and greys to make a low-ish volume palette.  The print with the leaves is a Lonni Rossi fabric that Ann at The Orange Crumpled Napkin sent me (thanks, Ann!!)


The quilt came to 30"x40", a perfect baby size.  I quilted it with straight lines outlining the seams to keep things simple and soft and backed it with some flannels from my stash.  A cream binding and it was all done; from start to finish in one morning!


This was the first time I've ever used Hobbs heirloom cotton batting and it won't be the last! I love how it made for a lighter quilt and I swear, I think it's softer than my quilts using Warm and Natural usually turn out. 


Another quilt, set off into the world to lead it's own life :)  I'm linking up to Finish It Friday, hop over there to see what everyone else has been up to.

[edited to add:] So there I was, cutting 1.5" strips of some lovely Kona Bone and I finally did it. Sliced a chunk off my finger with the rotary cutter. Those boogers are sharp! Blood got EVERYWHERE, except on the fabric. Lol. Surely that is some kind of proof I am a quilter? I'll sacrifice anything to keep the fabric clean. I don't think stitches will be needed, but I'll keep you posted. The worst part? I was going to finish that quilt today!

scene of the crime

Saturday, March 2, 2013

Quick picture post

Counting elephants. Because counting sheep is soooo pedestrian.