The newest string quilt is on the design wall today. A mix of girl spring time colors cut into 60 degree triangles.
I think if I actually put all these into one quilt it would be huge, so there may be more than one quilt in potentia here.
And as for the previous string quilt? Well, here's a sneak peak. It will have its big reveal later ;)
Linking to Judy's Design Wall Monday.
Sunday, December 7, 2014
Thursday, December 4, 2014
Friday Finish, with Ruffles!
Todays Friday Finish is a special one for a special family. The Nalles are adopting again! A few years ago I sent a quilt to their little boy Aaron, so this quilt is for his future sister.
Harper is coming from an eastern European country where it is hard to be an orphan, especially one with any special needs. Sometime this Spring, hopefully, she will know the love of a family for the first time.
This quilt used the same techniques as this one I made before. A focus fabric to pull colors from and strip piecing, each strip quilted differently.
Also, like the first one, I used ruffles. Such a fun, textural touch for a girly quilt.
I really enjoy quilting like this, using a variety of patterns in the same quilt. The most time consuming by far was the flower petals design I did on the focal fabric. The rest were all quite quick. I even did one brand new (to me) design, beads on a string.
The quilt has a cozy flannel back with cute novelty designs.
I had to piece the back since it finished at around 46" x 61".
The Sweetgums are just brilliantly yellow right now. They are trying to make up for those little sticker balls they drop all year round with their beautiful colors.
The Nalles are struggling to raise the amount of money it will take to cross the ocean and bring Harper home. Please go read their story and donate if you can! You will helping to change the life of a little girl forever.
Linking to Crazy Mom Quilts Friday Finishes.
Harper is coming from an eastern European country where it is hard to be an orphan, especially one with any special needs. Sometime this Spring, hopefully, she will know the love of a family for the first time.
This quilt used the same techniques as this one I made before. A focus fabric to pull colors from and strip piecing, each strip quilted differently.
Also, like the first one, I used ruffles. Such a fun, textural touch for a girly quilt.
I really enjoy quilting like this, using a variety of patterns in the same quilt. The most time consuming by far was the flower petals design I did on the focal fabric. The rest were all quite quick. I even did one brand new (to me) design, beads on a string.
The quilt has a cozy flannel back with cute novelty designs.
I had to piece the back since it finished at around 46" x 61".
The Sweetgums are just brilliantly yellow right now. They are trying to make up for those little sticker balls they drop all year round with their beautiful colors.
The Nalles are struggling to raise the amount of money it will take to cross the ocean and bring Harper home. Please go read their story and donate if you can! You will helping to change the life of a little girl forever.
Linking to Crazy Mom Quilts Friday Finishes.
Tuesday, December 2, 2014
Design Wall... Tuesday
For the past couple days I have been quickly assembling a couple of sweet little sixteen patches for a pair of sisters quickly approaching their 100th birthdays!
My stash is sorely lacking in "cute old-lady" fabrics, so I hit up Hancocks Black Friday sale and bought 1/4 yard chunks of two dozen different fabrics. The poor ladies at the cutting counter had a job!
The tops are both done and I have flannel for the backings, now just need to get them basted. Linking up to Design Wall Monday, if the linky is still open ;)
My stash is sorely lacking in "cute old-lady" fabrics, so I hit up Hancocks Black Friday sale and bought 1/4 yard chunks of two dozen different fabrics. The poor ladies at the cutting counter had a job!
The tops are both done and I have flannel for the backings, now just need to get them basted. Linking up to Design Wall Monday, if the linky is still open ;)
Wednesday, November 26, 2014
Lined Drawstring Bag Tutorial
Hello and welcome to another Wednesday :) Happy Thanksgiving to everyone in the US! I have a lot of projects going at the moment, most of which are not in very photogenic stages. Today I am going to finish the ZigZag strip for the Fair Isle Quilt Along. I also have the blue and brown string quilt basted and quilting will begin today. ...As soon as I make up my mind how to quilt it.
But in the meanwhile, I made a quick, lined drawstring bag last night, and I took pictures so I could share the how-to :)
CUT: outer fabric 7.5" x 16.5", lining 7.5" x 19.5", drawstring (2) 18" long.
These instructions make a bag that finishes at 7" x 9", but you could easily adjust them for a smaller or larger bag. Just remember that the lining should always be 3" longer than the outer fabric.
Use your button hole foot to make button holes on the right side lining fabric on all four corners as shown. Use a 1/4" diameter button in the foot. The holes should be 0.5" in from the side and just over 0.25" in from the ends.
Don't cut these open yet, it will be easier to wait til later.
Fold both the inner and outer fabrics in half longways and sew the long sides closed with a 1/4" seam. Zig zag or serge the edges to keep fraying in check.
Leave a gap along the lining piece somewhere close to the folded end for turning later.
Turn the outer piece right side out and slide it inside the lining piece so they are right sides together. Pin along the top edge, nesting the seams at the sides. Sew with a 1/4" seam all the way around the top.
Pull the bag right sides out through the hole left in the lining fabric, then top stitch or ladder stitch that hole closed.
Push the lining down in to the outer fabric of the bag. Because the lining is longer there will be some left at the top. Make sure the amount of lining fabric showing at the top is even all the way around and that your button holes are completely on the outside, not rolled over the top.
Pin through both layers of the bag near he top of the outer fabric the keep the lining from shifting. Then sew along the seam between the two fabrics, creating a sleeve of the lining fabric at the top.
Now use your seam ripper to open up the button holes, being careful to only go through one layer of fabric. Then clip a safety pin to one end of one of your drawstrings and thread it though one of the button holes, all the way though the sleeve, not going through the other set of button holes, just passing underneath them, and back out next to where it went in. Knot or sew the ends together and repeat with the other drawstring on the other side.
And there you have a fully lined and quite professional looking drawstring bag!
Linking to WIP Wednesday at Freshly Pieced.
But in the meanwhile, I made a quick, lined drawstring bag last night, and I took pictures so I could share the how-to :)
CUT: outer fabric 7.5" x 16.5", lining 7.5" x 19.5", drawstring (2) 18" long.
These instructions make a bag that finishes at 7" x 9", but you could easily adjust them for a smaller or larger bag. Just remember that the lining should always be 3" longer than the outer fabric.
Use your button hole foot to make button holes on the right side lining fabric on all four corners as shown. Use a 1/4" diameter button in the foot. The holes should be 0.5" in from the side and just over 0.25" in from the ends.
Don't cut these open yet, it will be easier to wait til later.
Fold both the inner and outer fabrics in half longways and sew the long sides closed with a 1/4" seam. Zig zag or serge the edges to keep fraying in check.
Leave a gap along the lining piece somewhere close to the folded end for turning later.
Turn the outer piece right side out and slide it inside the lining piece so they are right sides together. Pin along the top edge, nesting the seams at the sides. Sew with a 1/4" seam all the way around the top.
Pull the bag right sides out through the hole left in the lining fabric, then top stitch or ladder stitch that hole closed.
Push the lining down in to the outer fabric of the bag. Because the lining is longer there will be some left at the top. Make sure the amount of lining fabric showing at the top is even all the way around and that your button holes are completely on the outside, not rolled over the top.
Pin through both layers of the bag near he top of the outer fabric the keep the lining from shifting. Then sew along the seam between the two fabrics, creating a sleeve of the lining fabric at the top.
Now use your seam ripper to open up the button holes, being careful to only go through one layer of fabric. Then clip a safety pin to one end of one of your drawstrings and thread it though one of the button holes, all the way though the sleeve, not going through the other set of button holes, just passing underneath them, and back out next to where it went in. Knot or sew the ends together and repeat with the other drawstring on the other side.
And there you have a fully lined and quite professional looking drawstring bag!
Linking to WIP Wednesday at Freshly Pieced.
Tuesday, November 18, 2014
WIPs: Reindeer and More Strings
It's Wednesday and here's what I'm working on :)
I'm up to 66 string blocks on the design wall. My blue and brown string piles are getting smaller but there are still a surprising number left!
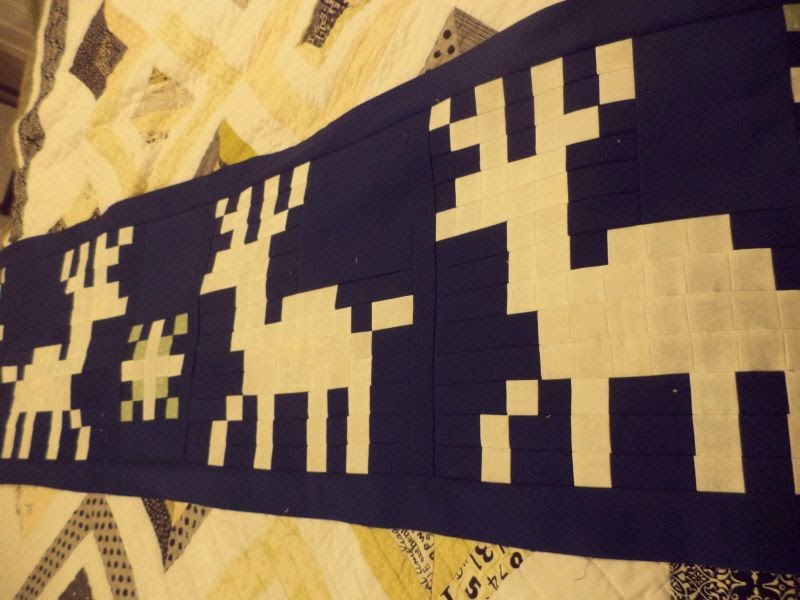
I also got my Reindeer blocks done for the Fair Isle Quilt Along. Just in time, as the next installment goes up on Thursday. I would have gotten a bit more done but yesterday was interrupted by a trip to the vet. Wilson has pneumonia (again.) Fortunately a some meds and fluids and he was much improved today. Here's hoping we caught it early and everything will be fine :)
Linking up to WIP Wednesday and the Fair Isle Quilt Along, both at Freshly Pieced.
I'm up to 66 string blocks on the design wall. My blue and brown string piles are getting smaller but there are still a surprising number left!
I also got my Reindeer blocks done for the Fair Isle Quilt Along. Just in time, as the next installment goes up on Thursday. I would have gotten a bit more done but yesterday was interrupted by a trip to the vet. Wilson has pneumonia (again.) Fortunately a some meds and fluids and he was much improved today. Here's hoping we caught it early and everything will be fine :)
Linking up to WIP Wednesday and the Fair Isle Quilt Along, both at Freshly Pieced.
Thursday, November 13, 2014
Strings in Action
If you remember last post I had sorted my overflowing string scraps by color. I decided to start tackling them by taking the two largest piles and making a traditional style string quilt.
I am foundation piecing on top of phone book pages to make 6.5" blocks of my true-blue (not teal) and brown scraps. I had really hope for bigger blocks, more like 8.5", but I live in a rather rural area and even by bumming a phone book from the nearest city I was only able to get a book just under 7" wide. So far 46 of a hoped-for 130 blocks are done.
The fun part of a quilt like this is deciding on the layout. From the traditional diamonds in the top picture to zig zags or a growing echo-diamond.
At this point I think I like the traditional small diamonds best, but I am reserving judgement until I have more blocks to rearrange and look at.
Linking to Design Wall Monday at Patchwork Times.
I am foundation piecing on top of phone book pages to make 6.5" blocks of my true-blue (not teal) and brown scraps. I had really hope for bigger blocks, more like 8.5", but I live in a rather rural area and even by bumming a phone book from the nearest city I was only able to get a book just under 7" wide. So far 46 of a hoped-for 130 blocks are done.
The fun part of a quilt like this is deciding on the layout. From the traditional diamonds in the top picture to zig zags or a growing echo-diamond.
At this point I think I like the traditional small diamonds best, but I am reserving judgement until I have more blocks to rearrange and look at.
Linking to Design Wall Monday at Patchwork Times.
Sunday, November 9, 2014
Fair Isle Quilt Along Week 2
Before this year I had never done a quilt along; now I've done 3! First the Triangle Quilt Along back in the spring, the Texas Quilt Along in the summer, and now I'm doing the Fair Isle Quilt Along from Freshly Pieced!
Here are the first 2 weeks worth of blocks up on the wall. You can see I am going ahead and piecing them into rows as I go. I originally thought that I wouldn't like QALs because I normally work much faster that that pace. Turns out it's kind of nice to take a project so slow! Plus it gets me to do things I normally wouldn't try.
I also finished this simple strip quilt top this week. All the colors were pulled from that floral fabric at the top and bottom. Now I just need to trim it up, baste and quilt!
And my strings were in desperate, desperate need of sorting. So last evening to folded them all into color piles. Time to do something with these :)
Linking to Patchwork Times Design Wall Monday and Freshly Pieced Fair Isle QAL.
Here are the first 2 weeks worth of blocks up on the wall. You can see I am going ahead and piecing them into rows as I go. I originally thought that I wouldn't like QALs because I normally work much faster that that pace. Turns out it's kind of nice to take a project so slow! Plus it gets me to do things I normally wouldn't try.
I also finished this simple strip quilt top this week. All the colors were pulled from that floral fabric at the top and bottom. Now I just need to trim it up, baste and quilt!
And my strings were in desperate, desperate need of sorting. So last evening to folded them all into color piles. Time to do something with these :)
Linking to Patchwork Times Design Wall Monday and Freshly Pieced Fair Isle QAL.
Subscribe to:
Posts (Atom)