Wednesday, August 7, 2013
One step forward, Two steps back
So this is what I've been doing in my evenings this week. I have a couple of partially-quilted quilts which became UFOs because I began quilting them and then realized my plans weren't going to work. Un-sewing is not my preferred way to spend my sewing time, (hence these have been sitting idle for a while... months?) but it's the perfect way to spend an evening when you're exhausted and just want to watch TV and do something mindless with your hands.
Tomorrow I'll have the post up about finishing the sail boat quilt :) Happy Hump Day!
Sunday, August 4, 2013
Weekend WIP
This was a good weekend for sewing. In addition to finishing the Sail Away quilt (post coming later this week) I got the backing put together for the Bird Houses quilt and basted it. This one has been sitting around for a while just waiting for the backing to be finished. In the end, the shade of brown solid on the back isn't quite dark enough, but this is a case where done is better than perfect.
I pin baste my quilt and usually I can shut the pins by hand, although it hurts my finger nails. In an effort to save my nails I tried something different today. There's a tool called a Kwik Klip that's designed to close safety pins and save your nails. I decided to try something similar with a wooden chop stick.
Carving a couple of shallow grooves all the way around the end of the chop stick gave the pins a place to catch. It's a little awkward at first to figure out how to best use the tool and get your rhythm, but once I got the hang of it I'd say it's as fast as closing them by hand. And best of all, no sore nails!
I am working through Wednesday, but after that I am looking forward to getting this one quilted. Linking up to Design Wall (um-- make that Design Floor) Monday at Patchwork Times.
I pin baste my quilt and usually I can shut the pins by hand, although it hurts my finger nails. In an effort to save my nails I tried something different today. There's a tool called a Kwik Klip that's designed to close safety pins and save your nails. I decided to try something similar with a wooden chop stick.
![]() |
| Homemade safety pin closer |
Carving a couple of shallow grooves all the way around the end of the chop stick gave the pins a place to catch. It's a little awkward at first to figure out how to best use the tool and get your rhythm, but once I got the hang of it I'd say it's as fast as closing them by hand. And best of all, no sore nails!
I am working through Wednesday, but after that I am looking forward to getting this one quilted. Linking up to Design Wall (um-- make that Design Floor) Monday at Patchwork Times.
Tuesday, July 30, 2013
Sailing Along: WIP Progress
Two days off is barely enough time to recover before I am back to work. I spent the entire day Monday napping and still went to bed at 10! Despite spending much of my "weekend"asleep, I did manage to assemble the "Sail Away" quilt top this afternoon.
I elected to go without borders or corner-stones because the top was becoming larger than I wanted. Instead I just sashed it with more of the same natural-colored linen and used the HSTs on the back. I have an embroidered panel for the back (detail of the embroidery in this post), so I made the HSTs into a border for it. Worked out perfect!
I have the weekend off coming up, so hopefully I can get this basted by Monday.
Linking up to WIP Wednesday at Freshly Pieced.
I elected to go without borders or corner-stones because the top was becoming larger than I wanted. Instead I just sashed it with more of the same natural-colored linen and used the HSTs on the back. I have an embroidered panel for the back (detail of the embroidery in this post), so I made the HSTs into a border for it. Worked out perfect!
I have the weekend off coming up, so hopefully I can get this basted by Monday.
Linking up to WIP Wednesday at Freshly Pieced.
August do. Good Stitches String Blocks
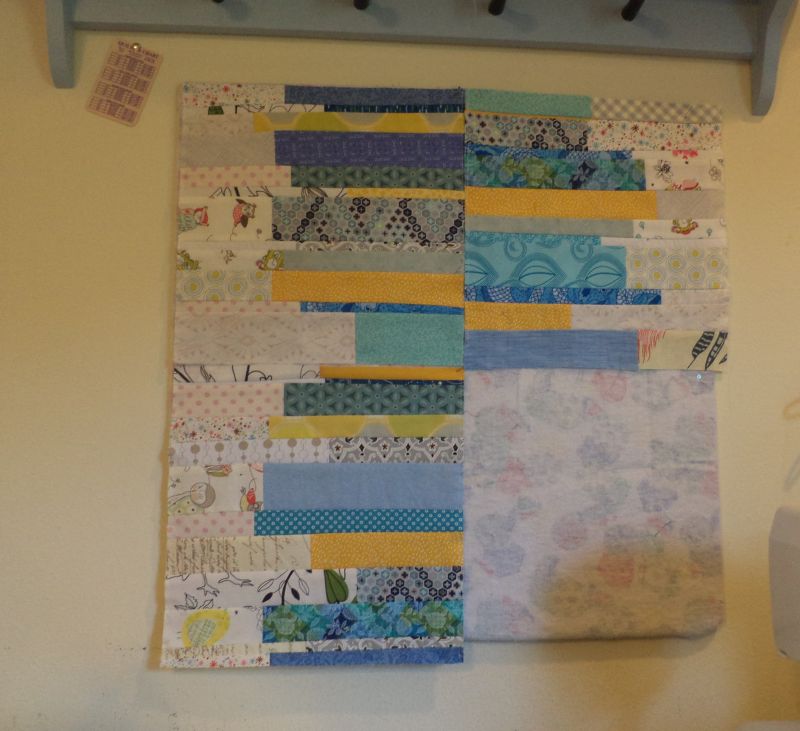
Hello Good Stitchers! It's my month as quilter for the Nurture circle again. I know I gave you guys a pretty easy, quick block back in May, so maybe you can forgive me for this month's block being a little more intense ;) Honestly, I got my blocks done in a couple hours, so I don't think you'll have too much trouble.
This month we are making scrap string blocks with blues, grey, yellow, and low volume fabrics. I'm including another palette to give you color ideas, but unlike last time you don't need to worry about sticking really close to the particular hues, it's just to give you a jumping off point.
I'm so glad Louise introduced low volume fabrics to our group in last month's block (here's a handy link to her tutorial with explanation.) I had already been planning to do this block and struggling with how to best explain them, and she did a great job! Louise's post illustrates a technique for trialing your low volume fabrics using a camera. I talk about a few other techniques here. Whatever works for you, works for me!
So, step 1 for this block is to get into your strings and pull the colors you need. Look at the blocks I made in the first picture on this page for a guide to your color selections. For the "focus" strings we are going for all shades of blue and teal (minus super bright, primary color blue), a little bit of grey, and a little bit of yellow. When choosing these fabrics please think of a more grown up, slightly "mellow" palette rather than a bright, juvenile one. (I hope that makes sense.) You'll also need low volume fabrics for the "background" strings. Try to choose almost all prints, but you can throw in a few solids, too.
Get into your scraps and make a mess! "Strings" in quilting means a lot of different things to different people, but for purposes of this project a string is a piece of fabric that is between 0.75" and 2.5" wide and at least 4.5" long unfinished (but usually much longer). When I pull fabrics for a scrap project I dump out the appropriate scrap container and sort it. In this initial sort I am usually not too picky, pulling anything that looks like it might work. Then I can pick out the best fabrics when I get to sewing.
Step 2 is to start sewing! Match colored and low volume strings of approximately the same width (you may have to trim one of them a bit), making sure that the combined length of the two strips will add up to at least 13", and sew them together along their short end. Remember, scrap quilting is all about making do with what you have, so try to avoid cutting new strings for this project. After sewing trim the new, combined string to about 13" (err to the side of too long, rather than too short).
Once you have sewn up a handful of strips take some time to iron them, pressing the seam toward the darker fabric. You can start putting them up on the design wall at this point and playing with them. The determine how many you need to make arrange the strings in a stack so that their edges just touch and measure the height. Subtract 0.5" x the number of horizontal seams (one less than the total number of strings) to get the height that your block/column would be if you sewed them together. Since I am asking for (2) 12.5" blocks you'll need to have a column of at least 25" finished.
Step 3 is to step back and admire your work. Once you've sewn up a bunch of strings is a good time to take a break. I like to leave these up on my design wall for a while so I can look at them throughout the day. Each time you see them is an opportunity for things that don't blend well to jump out at you. Since we're working for scraps it's likely that some of your fabrics just won't "go" with the rest of them once you see them all together. That's totally fine! Just pull them out and back in the scrap box they go.
Up close, scrap projects like this can look busy and messy. It's hard to see the design and nothing looks like it goes! Getting some distance is a good way to see the big picture. Another thing I like to do is look at the wall with my glasses off. Usually, the colors that don't belong immediately become obvious. Since I know that everyone is not (ahem) blessed with being horribly near sighted I tweaked one of the pictures I took to show you what I see.
See that teal and grey string in the lower left that's jumping out in the pic above? The grey is too dark, it's not reading as white. The string group looked much better with that one gone, but I probably never would have noticed it if I hadn't done the glasses-off test. (For those of you not blessed with myopia, my mother says you can get this same effect by crossing your eyes a little bit, kind of like how you do those Magic Eye illusions.)
Once you are happy with the colors of your strings step 4 is to start sewing them together, keeping the darks on one side and lights on the other. Remember we are basically going for a random look, so don't stress too much about the order. I recommend sewing all your strings into one long column and then cutting your 12.5" blocks from it.
You can press as you go if you feel like you need to, but I don't think it's necessary to press until you're done with this step. Also, please don't press the seams open. In this kind of quilt I worry that it will make the seams more likely to split. Don't stress about seams that aren't perfectly straight, trust me, it will look GREAT all together and you'll never notice.
Step 5, you're practically done! After ironing your column of strings, line up your ruler with the horizontal seams and cut (2) 12.5" blocks from it. If your column was more than a couple inches too long, don't hesitate to send along the extra as well :) To protect your blocks during shipping and assembly please sew a line of stay-stitching about 1/8" from the edge on the sides with many seams. And that's it! Thank you for helping to make what I think will be a stunning quilt!
![]() |
| I got so excited, I made 3 of them! |
(Edit: See the finished quilt here!)
This month we are making scrap string blocks with blues, grey, yellow, and low volume fabrics. I'm including another palette to give you color ideas, but unlike last time you don't need to worry about sticking really close to the particular hues, it's just to give you a jumping off point.
I'm so glad Louise introduced low volume fabrics to our group in last month's block (here's a handy link to her tutorial with explanation.) I had already been planning to do this block and struggling with how to best explain them, and she did a great job! Louise's post illustrates a technique for trialing your low volume fabrics using a camera. I talk about a few other techniques here. Whatever works for you, works for me!
So, step 1 for this block is to get into your strings and pull the colors you need. Look at the blocks I made in the first picture on this page for a guide to your color selections. For the "focus" strings we are going for all shades of blue and teal (minus super bright, primary color blue), a little bit of grey, and a little bit of yellow. When choosing these fabrics please think of a more grown up, slightly "mellow" palette rather than a bright, juvenile one. (I hope that makes sense.) You'll also need low volume fabrics for the "background" strings. Try to choose almost all prints, but you can throw in a few solids, too.
![]() |
| Making a mess is the first step in scrap quilting |
Get into your scraps and make a mess! "Strings" in quilting means a lot of different things to different people, but for purposes of this project a string is a piece of fabric that is between 0.75" and 2.5" wide and at least 4.5" long unfinished (but usually much longer). When I pull fabrics for a scrap project I dump out the appropriate scrap container and sort it. In this initial sort I am usually not too picky, pulling anything that looks like it might work. Then I can pick out the best fabrics when I get to sewing.
![]() |
| The white piece will need to be trimmed a bit, but the two together easily add up to 13" long. |
![]() |
| Match strings of the same width and sew along the short end |
Step 3 is to step back and admire your work. Once you've sewn up a bunch of strings is a good time to take a break. I like to leave these up on my design wall for a while so I can look at them throughout the day. Each time you see them is an opportunity for things that don't blend well to jump out at you. Since we're working for scraps it's likely that some of your fabrics just won't "go" with the rest of them once you see them all together. That's totally fine! Just pull them out and back in the scrap box they go.
Up close, scrap projects like this can look busy and messy. It's hard to see the design and nothing looks like it goes! Getting some distance is a good way to see the big picture. Another thing I like to do is look at the wall with my glasses off. Usually, the colors that don't belong immediately become obvious. Since I know that everyone is not (ahem) blessed with being horribly near sighted I tweaked one of the pictures I took to show you what I see.
![]() |
| The nearsighted quilter's design wall :) |
Once you are happy with the colors of your strings step 4 is to start sewing them together, keeping the darks on one side and lights on the other. Remember we are basically going for a random look, so don't stress too much about the order. I recommend sewing all your strings into one long column and then cutting your 12.5" blocks from it.
You can press as you go if you feel like you need to, but I don't think it's necessary to press until you're done with this step. Also, please don't press the seams open. In this kind of quilt I worry that it will make the seams more likely to split. Don't stress about seams that aren't perfectly straight, trust me, it will look GREAT all together and you'll never notice.
![]() |
| Stay-stitched to keep the edges from unraveling |
![]() |
| 3 string blocks on the wall |
(Edit: See the finished quilt here!)
Sunday, July 28, 2013
Sail Away on the Design Wall
Well, it's Monday again. Feels like Saturday to me since I worked all weekend. I can't wait to get busy putting this top together! I made these blocks last week based on a quilt I saw at Blue Elephant Stitches. The blocks need to be trimmed up and sashed and then I will need to settle on a border option to make use of my bonus HSTs :)
Happy Sewing! I am linking up to Design Wall Monday at Patchwork Times.
Thursday, July 25, 2013
What I did on my day off...
Tomorrow starts a 3-day weekend of 12-hour shifts, so I had a long list of things I wanted to get to today before I headed back to work. I have plenty of UFOs that need to be worked on, so what did I do? Started a new project, naturally!!
I decided to make a throw quilt based on this one at Blue Elephant Stitches. The biggest change I made was to make the boat's hull out of one piece so that I could showcase some novelty fabrics. These cute little sail boats will be perfect for two little boys :)
I selected my fabrics and cut them last night. I went with my usual method of making two HSTs at a time by cutting squares and sewing on either side of the center diagonal. (Method #2 here.) Making the hull pieces yielded 2 bonus HSTs per boat. I am thinking about using these as corner stones in the sashing, or else on the back.
Each boat gets 6 little HST sails.
Lots of sewing, pressing, and cutting and at the end of the day I have a stack of 16 cute little boats!
Can't wait until Monday when I can get back to work on this one. I have promised myself that this will not become another UFO :/
Yesterday was my last day at the job I've had for over 2 years at the embroidery shop. I took the opportunity to make a few more embroidered panels for quilt backs. These feature a poem that's been on the side of our refrigerator my whole life. I made 5 in various colors.
Speaking of babies, Wilson had a rough day. (His least favorite parts by far were my attempts to give him Benadryl.) I think he got stung by a wasp or a bee; his face was swollen up like a chipmunk. I was worried about his breathing with so much swelling around his airway, especially since he is always so congested with his allergies already and gets winded easily.
Fortunately, he seems to be fine and by dinner the swelling had started to go down. So the kitty is well, the laundry is done, a new project is well on its way and I guess everything is ready for me to go back to work tomorrow :)
![]() |
| Chain piecing like the wind! |
![]() |
| Brights fabric selections |
I selected my fabrics and cut them last night. I went with my usual method of making two HSTs at a time by cutting squares and sewing on either side of the center diagonal. (Method #2 here.) Making the hull pieces yielded 2 bonus HSTs per boat. I am thinking about using these as corner stones in the sashing, or else on the back.
![]() |
| Hulls and HSTs |
Each boat gets 6 little HST sails.
Lots of sewing, pressing, and cutting and at the end of the day I have a stack of 16 cute little boats!
Can't wait until Monday when I can get back to work on this one. I have promised myself that this will not become another UFO :/
Yesterday was my last day at the job I've had for over 2 years at the embroidery shop. I took the opportunity to make a few more embroidered panels for quilt backs. These feature a poem that's been on the side of our refrigerator my whole life. I made 5 in various colors.
"Cleaning and scrubbing
can wait 'til tomorrow
for babies grow up
we've learned to our sorrow
So quiet down cobwebs
dust go to sleep
I'm rocking my baby
and babies don't keep"
![]() |
| Wilson had a rough day |
Speaking of babies, Wilson had a rough day. (His least favorite parts by far were my attempts to give him Benadryl.) I think he got stung by a wasp or a bee; his face was swollen up like a chipmunk. I was worried about his breathing with so much swelling around his airway, especially since he is always so congested with his allergies already and gets winded easily.
![]() |
| a better picture of the swelling |
Sunday, July 21, 2013
Tackling my oldest WIP
I finally have something on my design wall today. It seems like it's been forever since I actually sewed for a quilt. Having a real job just saps all my energy. But, this weekend I finally got motivated and inspired to put in some sewing time.
I saw the ad for the NYC Mod Guild's Double Wedding Ring Challenge and it reminded my of one of my earliest projects (the last post about it was in May 2010). This quilt became something of a personal demon for me, but I have decided to try to tackle it again for entry into the modern, free-for-all category of the DWR challenge. I have until December, so that should be plenty of time, right? (Hah!!)
I called it "A Couple of Squares," a riff off the Double Wedding Ring, because I think the design is similar. My first attempt (on top in the pic above) was so pitiful with seams not even close to matching I decided to just start completely over. This time I am going to try for a rainbow color fade look, going from red at the upper left to purple and the lower right. I redrew the template larger and started to try again yesterday.
Let's just say I quickly remember why I abandoned that particular project in the first place.
I haven't given up or changed my mind yet. One block down, 15 to go! If you haven't already checked out the DWR challenge you definitely should. There are 3 categories ranging from mini to full and traditional to modern, something for everyone!
Linking up to design wall Monday at Patchwork Times.
I saw the ad for the NYC Mod Guild's Double Wedding Ring Challenge and it reminded my of one of my earliest projects (the last post about it was in May 2010). This quilt became something of a personal demon for me, but I have decided to try to tackle it again for entry into the modern, free-for-all category of the DWR challenge. I have until December, so that should be plenty of time, right? (Hah!!)
I called it "A Couple of Squares," a riff off the Double Wedding Ring, because I think the design is similar. My first attempt (on top in the pic above) was so pitiful with seams not even close to matching I decided to just start completely over. This time I am going to try for a rainbow color fade look, going from red at the upper left to purple and the lower right. I redrew the template larger and started to try again yesterday.
Let's just say I quickly remember why I abandoned that particular project in the first place.
I haven't given up or changed my mind yet. One block down, 15 to go! If you haven't already checked out the DWR challenge you definitely should. There are 3 categories ranging from mini to full and traditional to modern, something for everyone!
Linking up to design wall Monday at Patchwork Times.
Subscribe to:
Posts (Atom)